Wednesday, October 30th, 2019 .

The demise of fast fashion darling Forever 21 might have you reaching for a Xanax, but should it? Not necessarily. After all, while one empire has fallen, some fast fashion brands are thriving.

Look at Target! Their private label pivot in 2018 has been hugely successful. Look at Old Navy! The Gap, Inc. brainchild plans to open 800 stores in the next decade. Look at Gymboree! The beloved clothing brand for babies and toddlers is making a comeback as a pop-up shop concept within The Children’s Place retail outlets.

See? There’s no need to panic. From new merchandising tactics to rebooted branding and marketing initiatives, there are all sorts of ways to keep a fast fashion business profitable. One of our favorite ways to keep your retail venture in the green is to improve your customer experience.

Not sure how to wow your customers? Keep reading for our favorite strategies.

Make customers feel welcome

One prominent reason many consumers turn to online shopping: pushy sales tactics that make them feel uncomfortable. While you should always greet walk-ins with a smile and a cheery “hello,” it’s time to reconsider retail standards that feel like the opening of a sales pitch. Instead of, “Can I help you with anything in particular?” try deploying friendly small talk. A comment about the rainy weather or a compliment on the cute sweater they’re wearing will make the customer’s experience feel more conversational than transactional.

And speaking of conversation, there’s no reason for your employees to avoid it. We’ve all been the only customer in an otherwise-empty shop, shrinking under the microscopic gaze of associates. Awkward! While private conversations should be kept off the sales floor, bantering about TV shows, sports teams, and other harmless topics can make customers feel at ease in your store. Remind them, though, that their body language is important: They need to look approachable 24/7 and they should always be paying attention to customers, ready to offer help on finding a size or snagging a dressing room.

Eliminate long lines

Online fast fashion retailers like Amazon and ASOS struggle with shopping cart abandonment. Brick-and-mortar retailers should be concerned about a similar situation: long waits for fitting rooms and cash registers. 

Lines have the tendency to intimidate rather than to encourage. Many shoppers will load up their arms with potential purchases, then turn to the line for the changing room and wonder if all these goodies are worth the interminable wait. One solution is to use a waitlist and appointment management app like Waitlist Me, which makes long lines disappear by taking them digital. Retail staffers can hold on to the merchandise customers are interested in and let them continue browsing while they wait. A quick text lets shoppers know when they reach the front of the line.

Improve staff productivity

Top-notch customer service starts with staffing. If your sales associates are overrun by to-dos or traffic, they’ll be too frazzled to show the level of service that results in sales and customer retention. Adding an app like Waitlist Me to your toolbox can help retail store managers make smarter real-time decisions based on how busy the store is.

Waitlist Me allows managers to easily view things like how many customers are waiting for help or a fitting room, and how long fitting rooms have been occupied. Keeping tabs on traffic patterns means that they know where bottlenecks are emerging so they can direct employees accordingly before customer experiences start to suffer.
Wednesday, September 28th, 2022 .

Waitlist Me offers several features for scheduling reservations and managing availability with simple business rules and scheduling limitations.

For advanced availability management, we have recently added features in our Platinum service for blocking out tables and setting flexible visit duration rules based on the group size and time of day. Adding more control in defining how long guests stay at tables improves the reliability of finding open tables and helps prevent double booking and other scheduling mistakes. It also makes it easy to see availability and the estimated times guests will be scheduled in the calendar view and when adding and changing reservations.

These new features can also be used in other industries to manage appointments and availability of staff, spaces, and other resources. Here’s how it works.

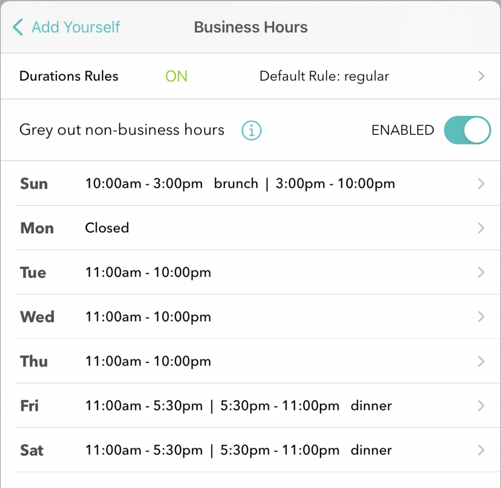
Settings – Duration rules work with the Business Hours features to allow different default durations to be set by group size and by time of day. To turn on Duration rule features go to Settings > Add Yourself > Business Hours and tap on Duration Rules at the top.

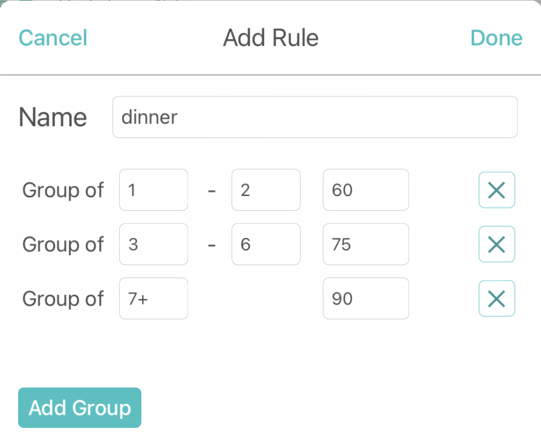
Creating a rule – Define the average times you’d expect guests to stay at your business and whether there is a difference by party size. The size groupings and times are customizable.

Managing rules – You can set up multiple rules if the amount of time customers may stay at your business varies by day or time. For example, you might have different rules for lunch and dinner. You can then apply the rules to different time periods in your business hours. Setting a default rule makes it easy to use the same rule for any time that you haven’t set an individual rule. In the example, a rule for regular hours is the default and there are different dinner and brunch rules for when visit times are different on the weekends.

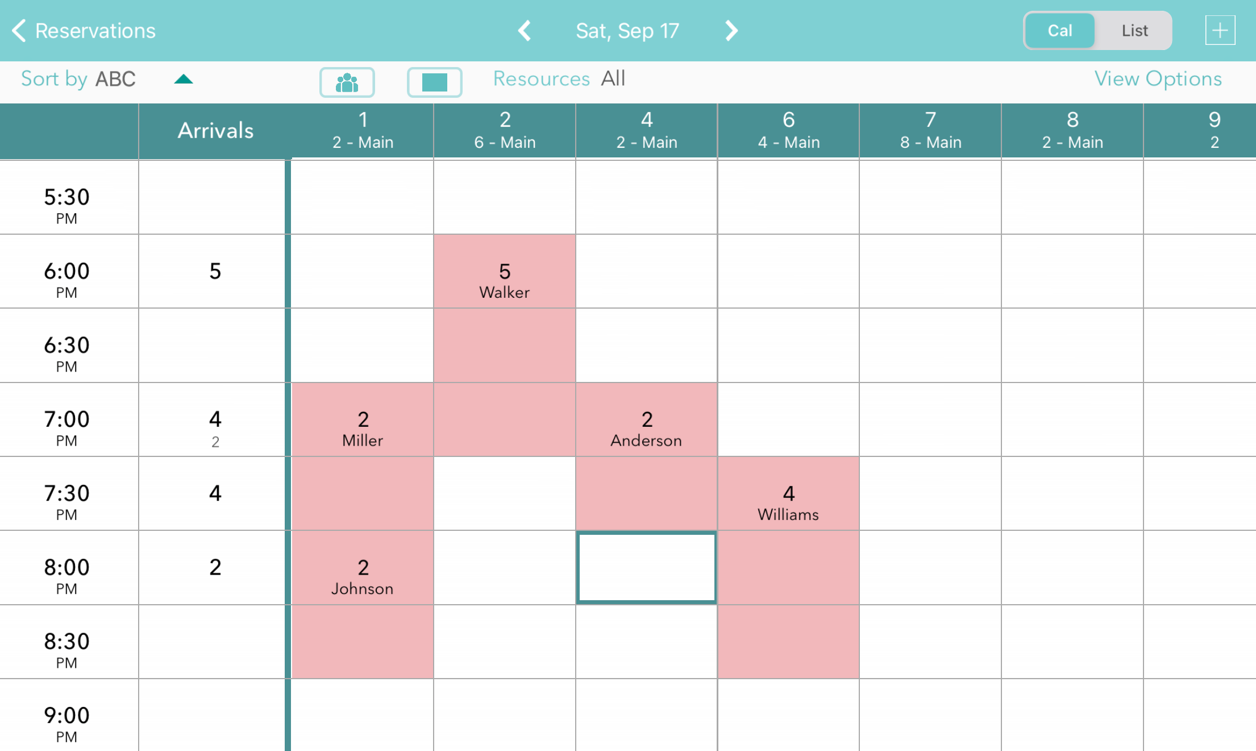
Calendar view – When using the duration rules and custom durations, you can easily see your availability in the calendar view. The tables that are occupied are blocked out in red for the times occupied. Pressing on an existing reservation allows you to edit the details or reschedule.

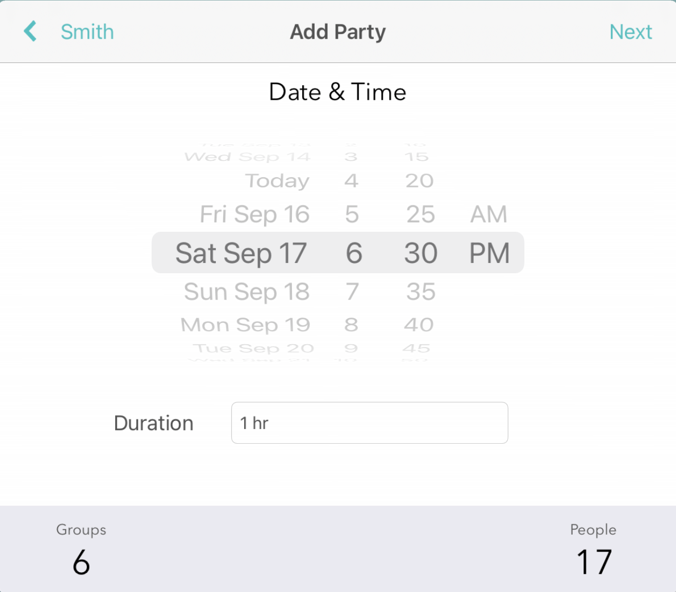
Scheduling guests – Press on an open area in the calendar to schedule a customer for the time and table of the area selected. Or press the plus button at the top and select a time and table. In both cases the duration will automatically be displayed based on the duration rules for the time and party size. This duration can also be changed manually.

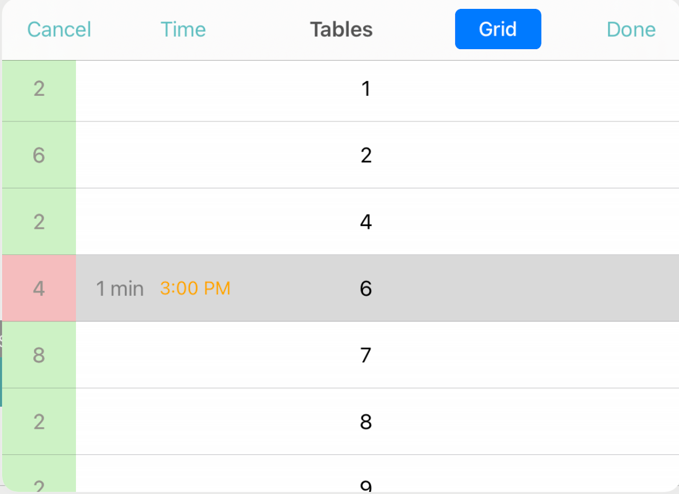
In the table selection view, tables that already have reservations at the time selected will display in red along with a time. If you try to schedule at an overlapping time a warning message will be displayed but can be ignored if needed in some circumstances.

These new scheduling features are designed to help businesses that have heavier scheduling needs and want more control over which tables and resources are booked. Businesses that have more walk-in customers may find some of our other table management features work well for them. And of course, these feature sets can be used together to optimize service for both walk-in and scheduled customers.

Wednesday, February 26th, 2020 .

Over the last decade, the restaurant week concept has found its way to communities across the United States. Conceived by restaurateur Joe Baum and Tim Zagat of the Zagat Survey, restaurant week has led to huge gains for the food and beverage industry. Some restaurants have seen as high as a 40-percent increase in customer volume during the promotional period.

Because many restaurant week customers are first-timers, this period is also the ideal time for dining establishments to capture repeat business. Ready to score some new regulars? Here’s how to wow everyone who walks through your door during restaurant week.

Land a great first impression

In Waitlist Me HQ’s hometown, Charleston, S.C., restaurant week is a twice-yearly event with additional, neighborhood-specific weeks thrown into the mix as well.  Many a hidden gem have earned stand-out word-of-mouth rep thanks to excellent restaurant week showings.

Earning that sweet referral business starts the moment your guests walk through the door. Comfortable seating, warm lighting, and plenty of heated or cooled space for guests to stand upon entry are vital. If you’re planning on making any upgrades, do so before the week is set to start—and if you’re painting or doing anything odiferous, schedule your refresh with plenty of time to air out any lingering fumes.

Craft a memorable menu

One restaurant week bummer we hear about regularly is this one: Chefs create delectable special menus, but they’re devoid of house specialties that new customers are hoping to try during the promotion.

Depending on your restaurant’s price-point and the promotional restrictions enforced by your restaurant week’s organizer, it might not be possible for you to offer all the goodies that are must-haves for your regular menu. We encourage you to try to find a way to bring popular picks to this more limited menu, too. Appetizer portions and tasting platters are two possible ways to make this happen.

Get the word out early

Large-scale community events are typically coordinated by a local chamber of commerce or another business-oriented organization. For restaurant weeks, food and wine festivals, and other tasty opportunities, these orgs tend to put together event guides or listings. To maximize your customer volume, it’s essential that your business be included in these publications.

Figuring out what you need to do to get your restaurant on the map, so to speak, is a cinch. Some tech-savvy chambers will offer orientation-style information online for restaurant owners and managers. However, you can always call your chamber to find out what information you need to send to the right people. Remember, they’re there to help!

Upgrade your customer service tech

Of all the bad times to have a waitlist snafu, restaurant week is one of the worst. We created Waitlist Me so that your restaurant doesn’t have to worry about getting your guests from your waiting area to your dining room; our tech helps you quote more accurate times and prevent walkaways.

Waitlist Me is a simple waitlist and reservation app that you can implement today. With a single glance, your host can see how many people are in line, how long they’ve been waiting, and when they’ll make it to their table. You can also easily add our web widget to your restaurant’s website and let your customers hop in line from wherever they are.

Monday, August 6th, 2018 .

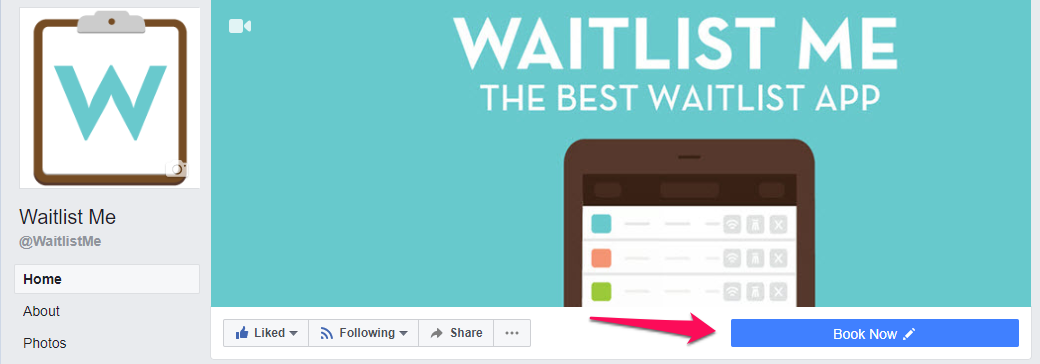
Did you know you can add a button to your Facebook page to take reservations or appointments? Allowing customers to book directly from social media is easy, and a great way to increase bookings.

Start by logging into your Waitlist Me account and copying the unique link for your hosted Web Widget. You can find this at www.waitlist.me > Account > Settings > Add Yourself. The link will be at the top of the page.

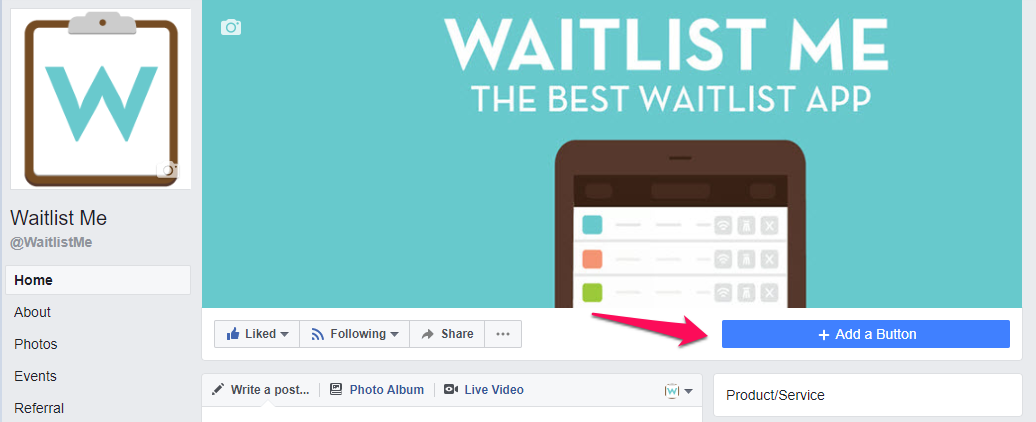
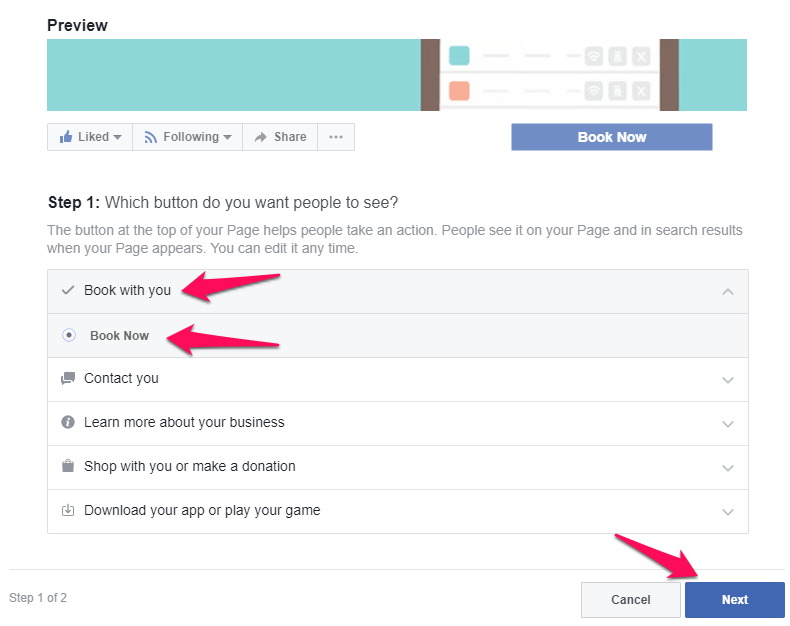
Next, go to your business’s Facebook page. Choose the Add a Button option on the right.


Choose Book with you, and then Book Now.


Select the Link to Website option, enter your Waitlist Me link in the pop up, press Save and then Finish. That’s it! You now have your very own reservation (or appointment) button on Facebook.


Friday, July 17th, 2020 .

Our table management and resource management tools help businesses track availability and the time customers spend at their business.  When assigning customers to a table or resource or moving customers between resources we have had a pop up for choosing from a list of assignments in some of our views.  In some cases this is a quick and effective method, but other times it may be easier to select a table from the floorplan view or a resource from the grid view, so we have added a new tap to add option that switches to these views for selection.  We have also optimized the action bar in the process to make it easier to view information on customers waiting for or occupying a resource and perform key actions like clearing, serving, and moving.

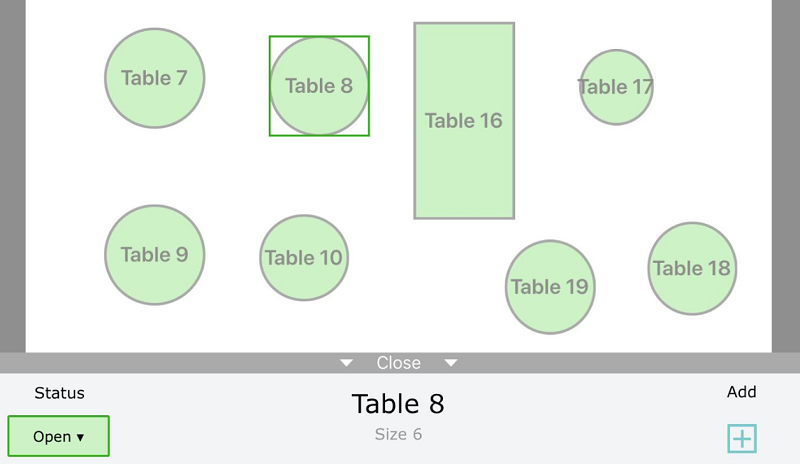
When you select an open table the action bar at the bottom will show the name & size, and the Add button will allow you to choose a party from the waitlist to assign to this resource. 

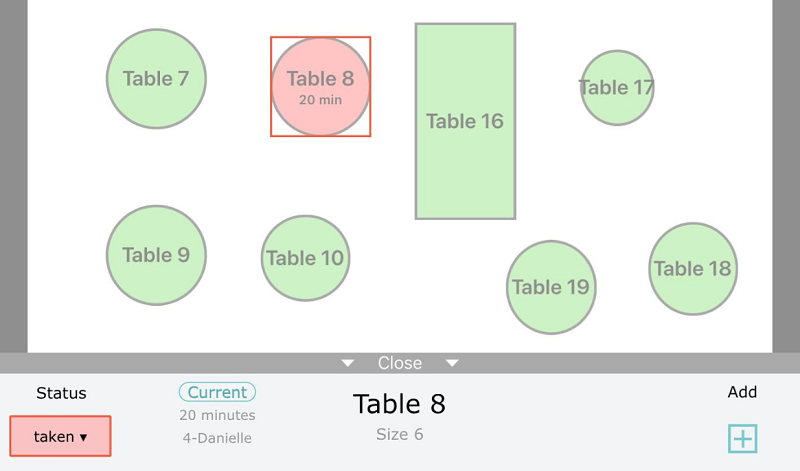
After a party is assigned to a table, tapping on that table will allow you to mark that customer as served (checking them off the waitlist), and show the table as occupied. 

Once a party is seated, tapping on their table will bring up an action bar to display the party’s name, size, and how long they have been there. Pressing the Current button will give options to move the party to another table, or clear that resource to mark it as available. You can also clear a party from a table by pressing their current ‘Taken’ status on the left of the action bar and selecting ‘Open.’

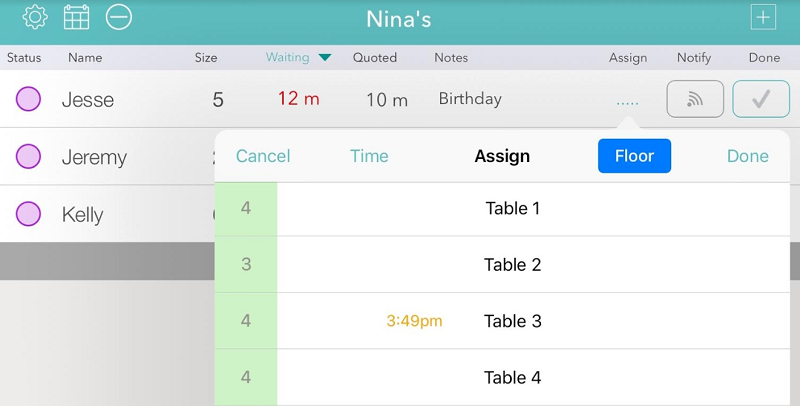
On the waitlist screen there are new options for assigning a party to a table. If you press in the Assign column for a party, you’ll see a list of tables that you can assign the party to. There will also be a new button at the top right of this menu, for Grid or Floor (depending on what view you’re using). Pressing that button would take you to the grid or floor view, where you could then tap on a table to assign the party. 

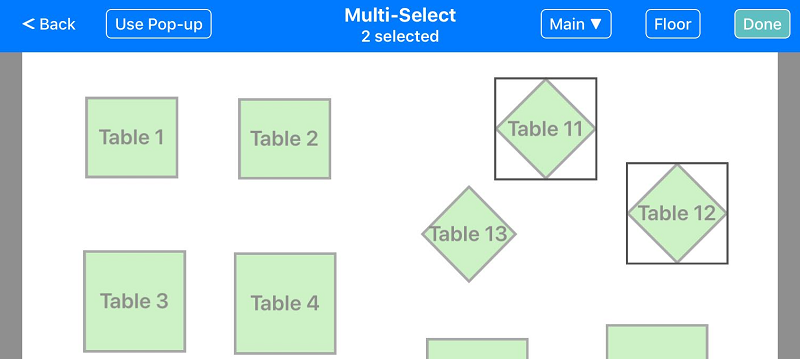
Once you choose Grid or Floor, the app will remember your selection and default you to that for future selections. The Floor/Grid button on the upper right will switch between those two views. If you prefer the list of tables, just choose Use Pop-up on the upper left. For the floorplan view, if you have more than one room you will also see your menu on the upper right to switch between rooms. 

When assigning a party to multiple tables, just press and hold the first one and then you will be able to select more. Press Done on the upper right to finish assigning multiple tables.