Our table management and resource management tools help businesses track availability and the time customers spend at their business. When assigning customers to a table or resource or moving customers between resources we have had a pop up for choosing from a list of assignments in some of our views. In some cases this is a quick and effective method, but other times it may be easier to select a table from the floorplan view or a resource from the grid view, so we have added a new tap to add option that switches to these views for selection. We have also optimized the action bar in the process to make it easier to view information on customers waiting for or occupying a resource and perform key actions like clearing, serving, and moving.
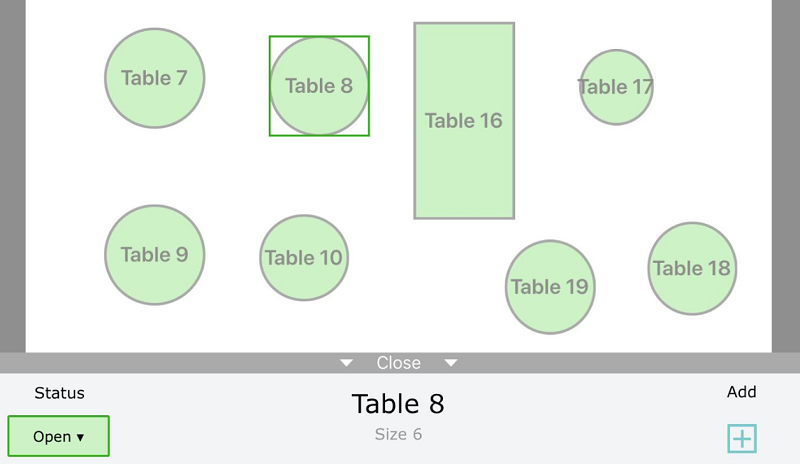
When you select an open table the action bar at the bottom will show the name & size, and the Add button will allow you to choose a party from the waitlist to assign to this resource.
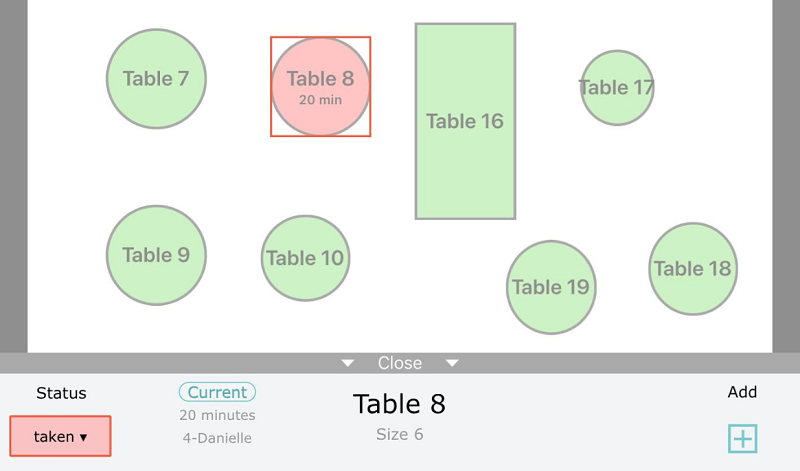
After a party is assigned to a table, tapping on that table will allow you to mark that customer as served (checking them off the waitlist), and show the table as occupied.
Once a party is seated, tapping on their table will bring up an action bar to display the party’s name, size, and how long they have been there. Pressing the Current button will give options to move the party to another table, or clear that resource to mark it as available. You can also clear a party from a table by pressing their current ‘Taken’ status on the left of the action bar and selecting ‘Open.’
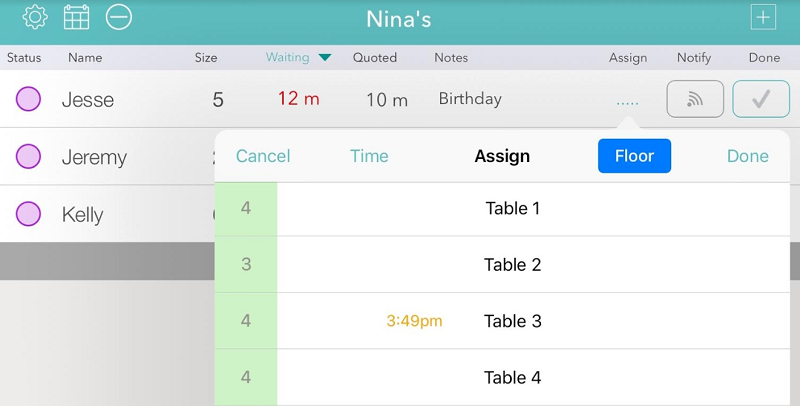
On the waitlist screen there are new options for assigning a party to a table. If you press in the Assign column for a party, you’ll see a list of tables that you can assign the party to. There will also be a new button at the top right of this menu, for Grid or Floor (depending on what view you’re using). Pressing that button would take you to the grid or floor view, where you could then tap on a table to assign the party.
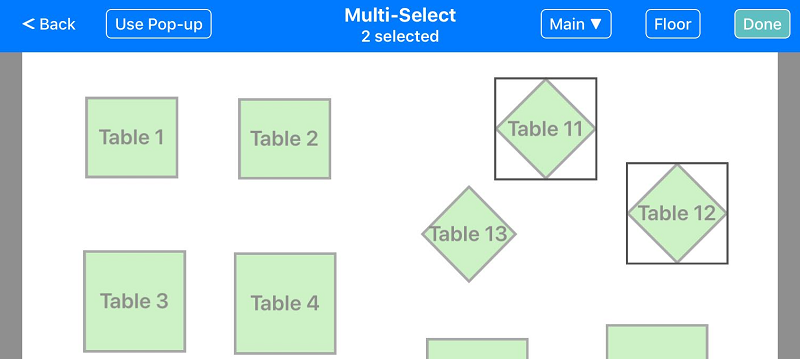
Once you choose Grid or Floor, the app will remember your selection and default you to that for future selections. The Floor/Grid button on the upper right will switch between those two views. If you prefer the list of tables, just choose Use Pop-up on the upper left. For the floorplan view, if you have more than one room you will also see your menu on the upper right to switch between rooms.
When assigning a party to multiple tables, just press and hold the first one and then you will be able to select more. Press Done on the upper right to finish assigning multiple tables.
Waitlist Me makes reservations and appointments simple with intuitive calendar and list views. It’s easy to schedule and manage your customers in our iOS and Android apps or from a browser on our website.
The Pro & Platinum levels of our service offer greater flexibility and control over scheduling rules, including setting business hours, adding party limits, and blocking off whole days, among other features. We recently added a few more customization options to these calendar views to increase the efficiency of some activities.
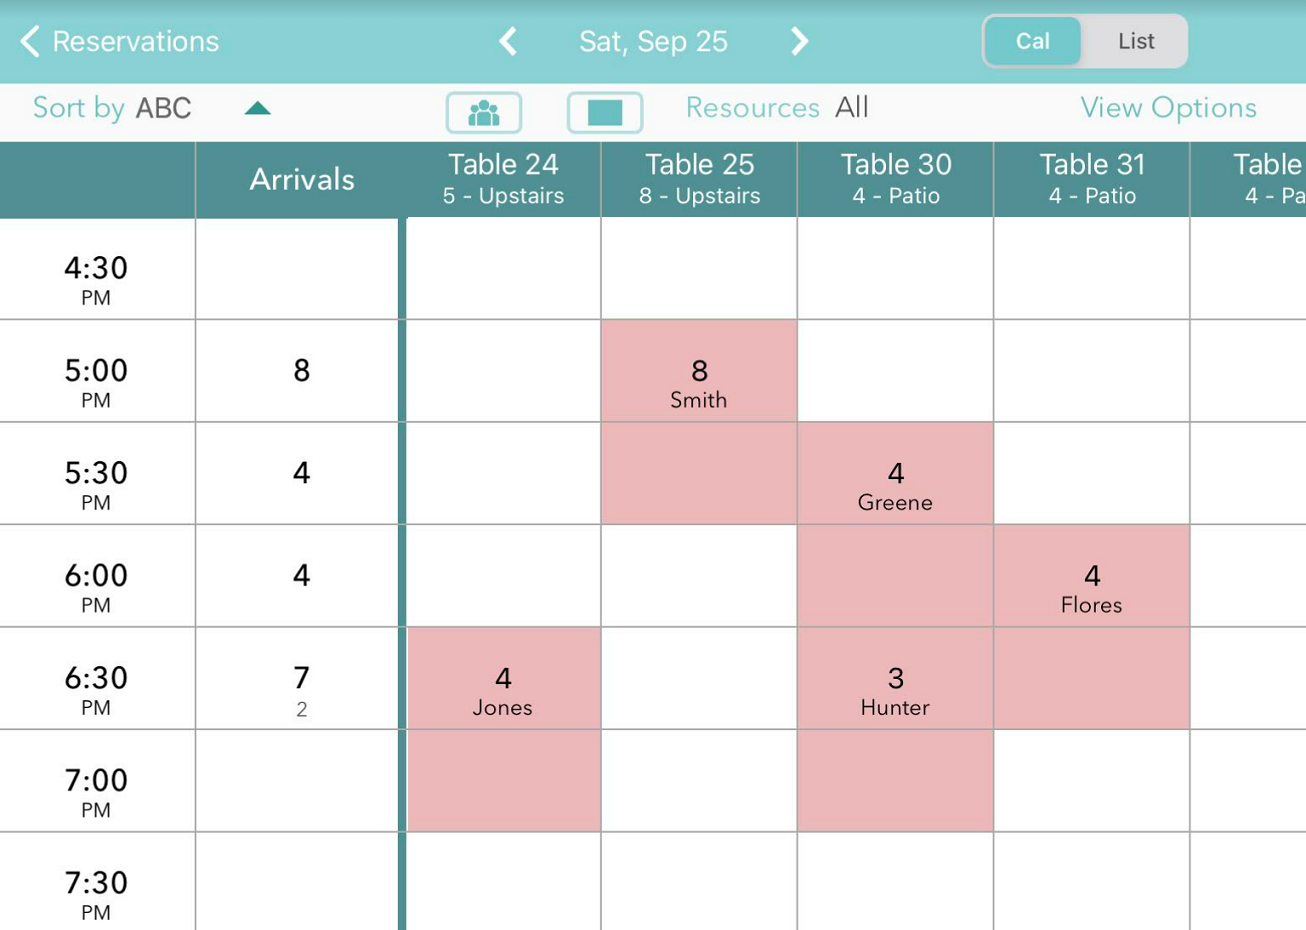
Now it is even easier to find openings by room and by group size. You can choose to view this information next to the table names for quick reference by pressing the people and the room icons in the header bar. The group size and room name will then be visible in the column headers under each table name.
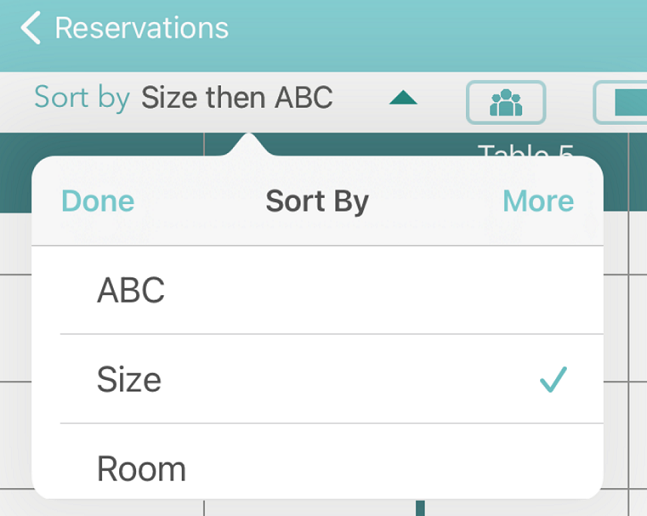
You can also sort the order of the table columns by these new dimensions using the ‘Sort by’ option on the top left. Choose to sort by rooms if you know you want to fill one room before moving to another. Sort by size to quickly find all the tables large enough for each party as you’re entering reservations. Use the ‘More’ option on the upper right of the sorting menu to add a secondary sort criteria and whether to display in ascending or descending order.
One additional improvement is being able to see the names of scheduled customers in the daily calendar view time blocks. If more than one customer is scheduled for a given time and table, just tap the box to see the details.
If you haven’t updated your reservation settings recently, we would also recommend going through this page to see some of the other features and personalization options.
Waitlist Me offers the Add Yourself Web Widget to make serving customers quick and easy, whether you prefer they reserve a time in advance or simply join the list if there’s a wait. Advanced scheduling just got even easier with our new email reservation features.
If your business wants to send automated reminders or needs additional information from customers before they arrive, then emails can be a great option. Also, they are not counted towards the bundled notification limits included with each subscription (US & Canada) or charged separately (all other international users/plans).
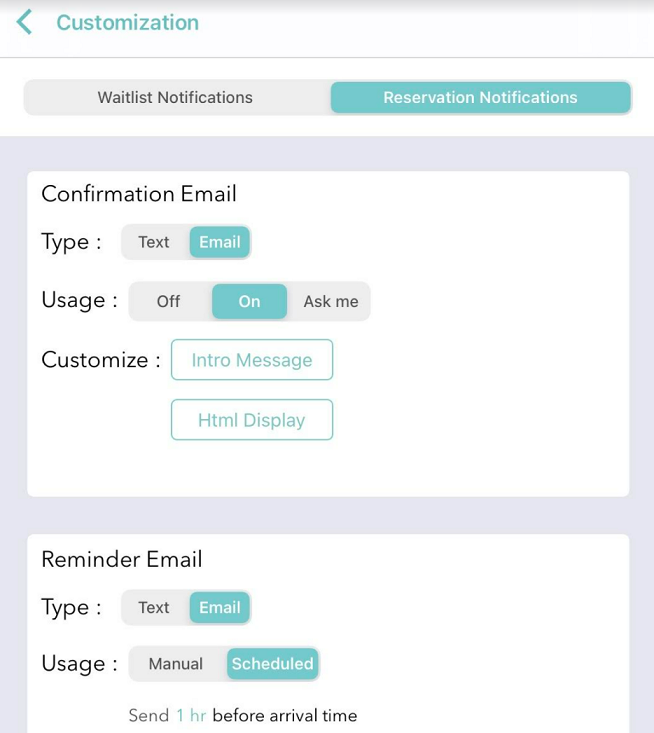
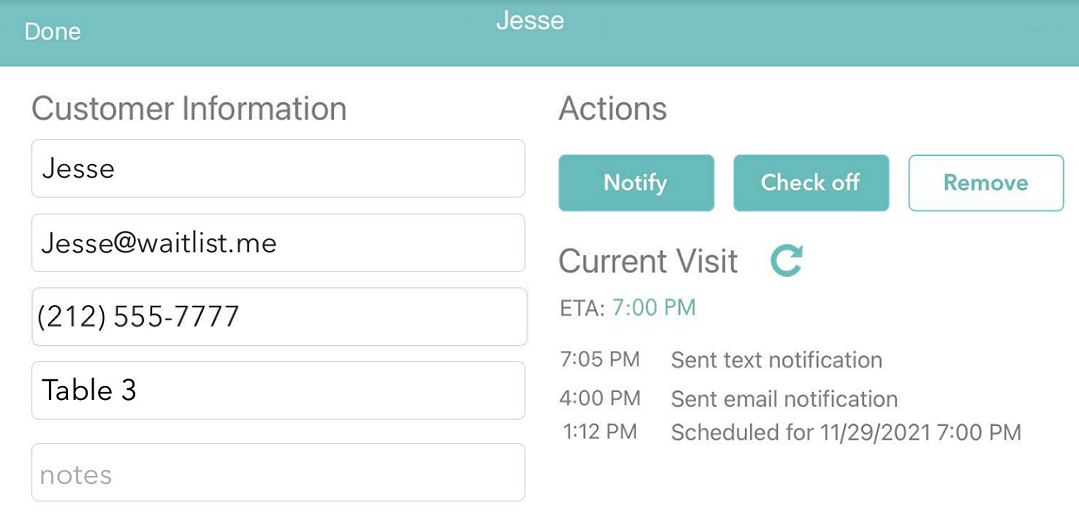
Enabling email notifications – To enable, navigate to the Notification settings for reservations (Settings > Customization > Notifications > Reservation). The Usage options let you choose whether the messages go out manually (by pressing the notification in the customer row in the waitlist view) or automatically (“Scheduled” option in the settings). In either case, the waitlist view notes and customer visit area of the edit view will show you when emails have been sent.
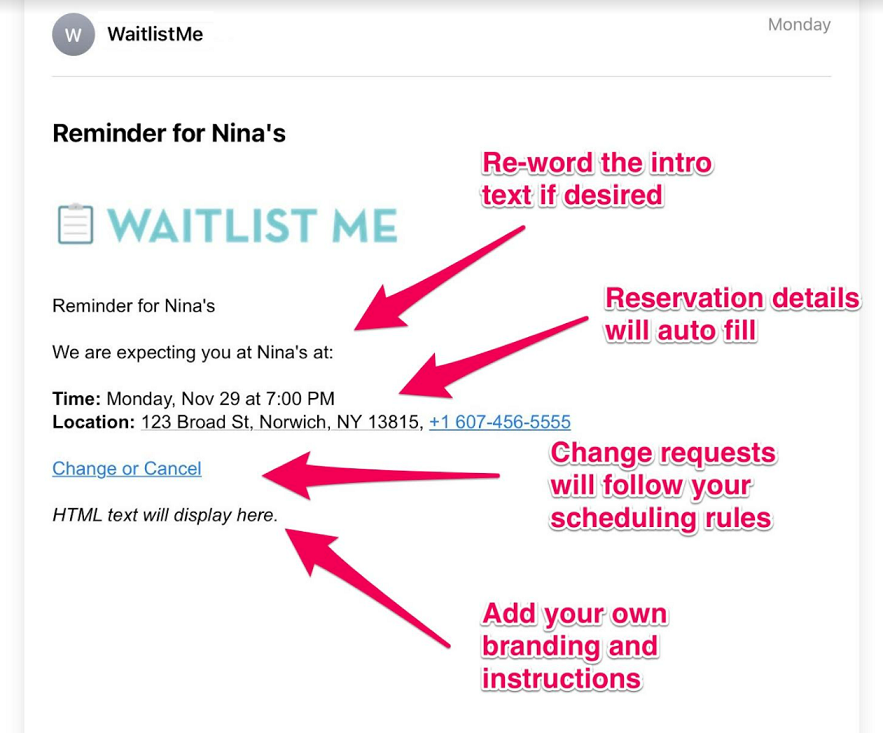
Customizing email notifications – Every email notification will automatically include the scheduled time of the reservation along with location information. In addition, it will include a customizable “Intro Message” that appears at the top of the email and can be used as an introduction or used to include basic instructions. Please note that there is a limit of 160 characters for the text in this area as it is intended to be simple. Pro Users can use the “HTML Display option” to customize the body of the email to include images, provide more detailed instructions and more. Below is an example of these parts of the email.
Changing and cancelling – Email notifications also include a link for your guests to “Change or Cancel” their reservation/appointment. This link opens a browser window on their phone or computer where they can select a different time or cancel their existing reservation altogether. A standard email confirming any change will go out automatically.
If you’ve been out to eat lately at any number of casual dining options, you’ve likely witnessed the growing popularity of pay-at-the-table services now available at restaurants large and small. It doesn’t take long to realize the significant upsides they offer. No more waving down waiters to get your check? No more tapping your toes while you wait for your receipt? This technology is a customer service game-changer.
What does this sort of service look like? Pay-at-the-table point-of-sale tech comes in a few different flavors. Keep reading to find out what they are and how they benefit different types of restaurants.
Tablets maximize ordering convenience
Early adopters, like Smokey Bones Bar & Fire Grill, introduced a tablet-style device that stays at the table. Diners can often use these devices not only to close out their tab at the end of their meal, but also to order food and beverages throughout their stay at a restaurant.
Many of these devices are also able to educate customers about membership or loyalty programs, daily specials, or featured menu options. And because they’re digital, they can offer glossy, mouth-watering photography that entices diners to order more items, like appetizers or desserts, or guide them towards items that offer a better margin for your bottom line.
This style of device has also filled a gap in settings like fast casual restaurants and eat-in bars where diners are offered full menus without traditional table service. Now, customers can order at their convenience without needing to wait in line or catch the eye of a busy bartender. In addition, it can help open-all-day restaurants provide prompt service with limited staff.
Hand-helds improve payment speed
More recently, restaurants have been introducing a new type of pay-at-the-table device. It’s a handheld unit used by servers to capture the entire dining experience, from beginning to end.
Traditionally, waiters memorize or scribble down orders on notebook pages. This heightens the risk of error when they need to transcribe their notes for the kitchen or transferring tables between shifts. Using this sort of pay-at-the-table device, though, servers can now input orders directly into a digital order management system. There’s no forgetting who wanted a margarita without the salt, who requested a sandwich with no pickles, and who needs a side of mayo with their fries. Happy customers 100-percent of the time? That’s the name of the game!
In addition to managing orders, servers are also able to use these pay-at-the-table devices as hand-held registers. Swiping credit or debit cards—by far the most popular method of payment option in dining establishments—adding tips, and printing receipts is literally in the palm of their hand. This is a boon for restaurants with tons of traffic. It increases table turnover and decreases the amount of stress on servers because they can now get more accomplished in a single visit to a table. Less-frazzled wait staff means a better work experience for them, a better dining experience for your customers, and a better bottom-line for restaurant owners and managers.
Another customer convenience game-changer? Waitlist Me
Keeping customers waiting can have a devastating impact on a restaurant. They might order less, tip less, leave a bad review, or walk out your door, never to return. Waitlist Me is an app that keeps customers happy while they wait.
How do we do that, exactly? It’s a breeze. Waitlist Me brings your waitlist from the lobby of your restaurant to an easy-to-manage digital interface. Our app makes it easy to see waiting customers at a glance, provide accurate wait estimates that are tracked in real time, and notify customers with a text or automated call message when their table is ready. It also has a number of other features like reservations, table management, and the ability for customers to add themselves from a kiosk, your website, or even Google.
With the floorplan features in Waitlist Me, it’s easy to visualize your tables and manage your sections and staff.
In Floorplan view, you’ll see all of your tables, arranged however you like. Green tables are open; red tables are occupied. You can also see how long a table has been occupied, or if it’s been reserved for a particular time. And you can tap on a table to open the action bar, where you can see details about the party, update their table’s status, clear the table when they’re done, and more.
You can also see your sections, marked with colors, dividing lines, or both. You can create custom layouts, and change these sections on the fly. Perhaps three sections is enough for a quiet lunch, but you need more for a busy evening. You can see which employee is working each section, and how many groups, and how many people, they’ve served today. You can zoom in for a closer look, and scroll across your floorplan. You can even see floorplans for other parts of your restaurant—for instance, for your patio or an upstairs meeting room. It’s all up to you.
To start building your own floorplans, just tap on the round icon to access the table management section.
Notice: Here in Grid view, you can see that I’ve already set up some basic tables. Each one has a name (in this case, the table number), and a size: the number of people it can seat. And I’ve divided those tables into sections. If you need any help with tables and sections, please see our video on “Managing Tables.”
Now, tap the button on the right, and switch to Floorplan view.
The first time you visit this page, you’ll be prompted to add a room—for instance, your main dining room. Just give your room a name, choose a portrait or landscape orientation for your floorplan, and then tap “Add.” You can add additional rooms if you like. Then, tap “Back,” to save. You can tap on the name of your room at any time, to see a different room, or to add additional rooms.
Now, tap “Edit,” to start building your floorplan. If you have not yet created your tables, just tap on the gear icon to access the table management settings, where you can manage your tables, sections, layouts, and more. Or, if you’re ready to proceed, just make sure you’ve selected the room you want to design. And then, tap “Add.”
You can choose an existing table from the list—or, add a new table at the top. (Simply give your new table a name, specify how many people it can seat, and tap Save.)
You’ll be prompted to choose the physical size, and the shape, for this table.
Now, just tap where you want your table to go. The table appears on your floorplan, along with a set of tools. You can tap and drag, to adjust your table’s position. Drag the arrows to stretch the table in a single direction. Use the double arrow to stretch your table in both directions at once. Tap the round arrows to rotate your table, by 45 degrees at a time. Tap the copy icon, and then choose an existing table or set up a new one, to make it exactly the same size and shape on your floorplan. Or, tap the dots, to edit the table’s name and size, or to delete it entirely. When you’re ready, tap anywhere else on the screen to hide these tools.
You can add as many tables as you need.
If you like, you can also use your floorplan to work with any sections and layouts you’ve defined for your restaurant. (For help setting up sections and layouts, please see our video on “Managing Tables.”)
Choose a room, and a layout. And then, tap “Add,” and choose “Element.”
You can add a dividing line—just tap to give your line a starting point, and an ending point. You can drag either of these points to adjust the angle of your line, or move the whole line to a new position. And again, tap anywhere else when you’re done.
Or, you can tap “Add,” choose “Element,” and then pick “Label.” Just choose which section this label is for. And tap on the screen to choose its position.
When your floorplan is complete, tap “Exit.” Then, tap “Yes” to save your changes.
Once you leave Edit mode, your section labels are automatically updated to show helpful details—by default, the name of the server in each section, and how many groups and individual customers they’ve served today.
Of course, you can come back to Edit Mode at any time, and update your floorplan. Or, you can modify your floorplan for another layout—for instance, to set up this same room for a different shift. Your tables remain where they are, but your lines and labels disappear, so you can set up a different set of sections for that shift. Then, you’ll be able to change your sections on the fly, as you move through your day.
Remember, you can tap the gear icon to access the settings pages for your tables, sections, and layouts.
For more options, tap “Display,” and then choose “Floorplan.” For instance, you can change the size of the text in your section labels, and decide what information those labels should include. By default, the label shows any notes for the section (for instance, the name of the server), and the total number of parties, and individual customers, who’ve been seated in that section today. But if you like, you can show the current number of open tables (and/or occupied tables) in each section, instead.
In the same way, you can decide what information should appear directly on your tables. By default, you’ll see how long each table has been occupied. But you can hide this information—or show the name of the section, instead. And if you’ve assigned colors to your tables, you can use these colors to highlight the table name (in this case, the table number), or highlight the name of the section, or not.
You can also come back to Grid view, tap “Time” at the top, and decide how to calculate the totals that will appear in the section labels on your floorplan. Would you like to see how many parties, and how many individual customers, you’ve served in each section all day, or just during the current shift? Or, would you like to see your totals for the past so many hours—from the past 1 hour, to the past 24?
Now, you’re ready to start using your floorplans. At the beginning of each shift, simply choose the appropriate layout, to instantly update your sections. Then, tap on any section label, for a list of all of your sections, and your notes on each one—in this case, the name of the server assigned there. Tap “Clear All,” fill in the servers for the new shift, and then save your changes, and you’re ready to get to work.
And remember, you can tap “Open” at the bottom, to enter split-screen mode, where you can see your floorplan, and your waitlist, at once. You can drag the handle to show more or less of the waitlist—or tap “Close” to hide it entirely and only see your floorplan.