Wednesday, May 13th, 2020 .

After mere weeks in quarantine, Americans went hog-wild with their new pet adoptions. Instagram feeds are packed with newly adopted furry critters, and there’s no sign of a let-up any time soon. If the coronavirus has a single silver lining, this just might be it.

With the flurry of potential pet parents, now is the perfect time to put your best paw forward. Enter Waitlist Me, a waitlist and reservation app that will help you score a gold star for customer service and keep your customers, volunteers, and pets as healthy as possible during the coronavirus pandemic.

Here are some ways animal shelters can use Waitlist Me right now to facilitate pet adoptions during COVID-19 and beyond.

#1. Corral crowds in their cars

Our collective new normal involves all sorts of protocols to keep us safe and healthy. We have adapted: We’re wearing masks in public, we’re standing 6 feet apart, and we’re shopping from the comfort of our cars to minimize the spread of coronavirus.

Enlisting cars as a crowd control tool is easy to do with Waitlist Me. Use our custom text notification feature to share simple coronavirus instructions with your customers, like to wait in their car until they are notified.  You can include this in the confirmation text that customers receive when you check them in or they schedule themselves.  Then when you are ready for them, just press a button to send them a notification it is their turn. If they reply back to a text you will see their message in the Waitlist Me app, and our Pro service includes an option to send open text responses to these messages for things like answering questions.

#2. Spread out demand with appointments

Another way to avoid a throng of eager adopters busting down your door is to encourage customers to make appointments.  This can help spread out demand to less busier times or can be used to avoid common bottlenecks that might require a specific staffer or area of your business. It can also help ensure you have the right number of staffers and volunteers when and where you may need them. 

Customers can use Waitlist Me’s web widget to quickly schedule an appointment with a few clicks, so they’ll be assured of their cuddle time and you’ll save staff’s time by letting people self-schedule. The Pro version of the service also comes with additional ways to customize the widget and set scheduling limits.

#3. Keep groups separate—and spaces sanitized

Some shelters across the nation are seeing their traffic skyrocket up to 90 percent! Because shelters are designed to make the most out of limited space, you often find yourself in tight quarters—not great when we need to be particularly germ-conscious.

That’s where Waitlist Me’s resource management feature comes into play. It’s completely flexible, making it easy to reconstruct the layout of your workspace within the app. When guests check in, you can assign them to a staff member or to an area, like your kitten play room, an application area, or a visiting room where they can get to know different animals. Once those guests leave, you know exactly where they’ve been—and you can sanitize accordingly.

And because you can use Waitlist Me on multiple devices, all your employees and volunteers can see where everyone is with a single glance. This lets you minimize potential contact as well as the need to have groups of guests pass each other in narrow spaces. Win-win!
Monday, June 4th, 2018 .

Aromatherapy facials, deep tissue massages, seaweed body wraps—all things R&R are on our radar this summer.

While your guests sip champagne and slip into jacuzzi tubs, we’re setting aside our cucumber slices. Why? Because dare-to-bare beach season is here! We’re revving up our waitlist and management app to help you handle the hustle and bustle of weekend trips, girls’ getaways, and long afternoons of head-to-toe pampering.

Here’s how Waitlist Me can help spas and salons crank up their customer service.

Balance walk-ins and reservations

There’s no need to fuss over the different types of clients you serve! Waitlist Me lets you handle them all with ease—and see where you can squeeze in a walk-in among a slew of reservations.

Keep tabs on multiple locations

Waitlist Me ensures that owners and managers of multiple locations don’t have to twiddle their thumbs wondering how business is going or tie up the phone lines. Our Multi-Location Management lets them check in 24/7/365 from wherever they are.

Let guests check themselves in

A line at your check-in desk can turn customers off. With Waitlist Me, though, you can quickly set up a Self Check-In Kiosk where guests can DIY instead of stand in line (and get to the R&R part of the visit way faster).

Offer accurate wait times

No more hazy estimates about how long it’ll take to finish up those French tips. Tracking actual waits next to estimates helps your staff learn to quote waits more accurately and know when things are running behind.

Ensure that every front desk attendant is in the loop

Forget about sharing a single reservation book with three hosts! Multi-Device Sync lets you put Waitlist Me on as many devices as you want, letting you ramp up staffing (and dial it down) whenever you need to.

Check availability at-a-glance

Waitlist Me is designed to be intuitive to use. That means your front-of-house staff can spend more time on customer service and less time scrolling through a zillion complicated screens.

Enable guests to wander while they wait

When a customer reaches the front of the line (or their masseuse becomes available), Waitlist Me lets you text them for free to let them know. And if they’re a few minutes away? No sweat. They can text back (and never have to worry about losing their spot).

Allow customers to make appointments on the fly

A spontaneous pedi? Why not! Our Add Yourself Web Widget is a second-tier feature that lets guests add themselves to your waitlist from wherever they are, no phone call necessary.

Offer a public waitlist

With Waitlist Me, there’s no need for toe-tapping impatience. Pop the public waitlist feature on a monitor or TV screen in your lobby, and guests can see for themselves where they are in line.

Track your ROI on-demand

Our app’s Pro-level analytics run in the background 24/7, making it easy to spot trends in the popularity of your services or employees.

Monday, June 21st, 2021 .

Whether you’re using the Waitlist Me web widget to let customers self-schedule or your team is entering reservations or appointments for customers, there are some optimizations you can make in your settings to get the most out of the scheduling features. 

If you plan to use the widget, on the Waitlist Me website go to Account > Settings > Add Yourself. The Main View section has a feature called Time Increments, which will control how frequently the time selection option shows reservation slots to customers. You can choose every 5, 10, 15, 30 or 60 minutes. (If you haven’t started using your widget yet, also see this page for the basic setup information.)

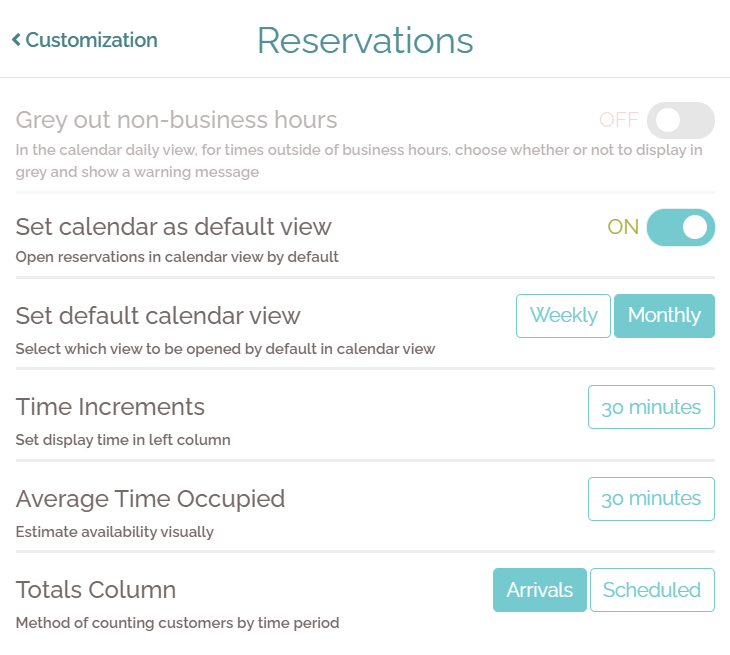
Click Waitlist at the top to go to the main waitlist page, then click on the settings gear icon and choose Reservations. You can customize the time increments you want displayed on your calendar view and the average time a table or resource is occupied.  Based on these settings you can block out your reservation availability visually in your calendar view.

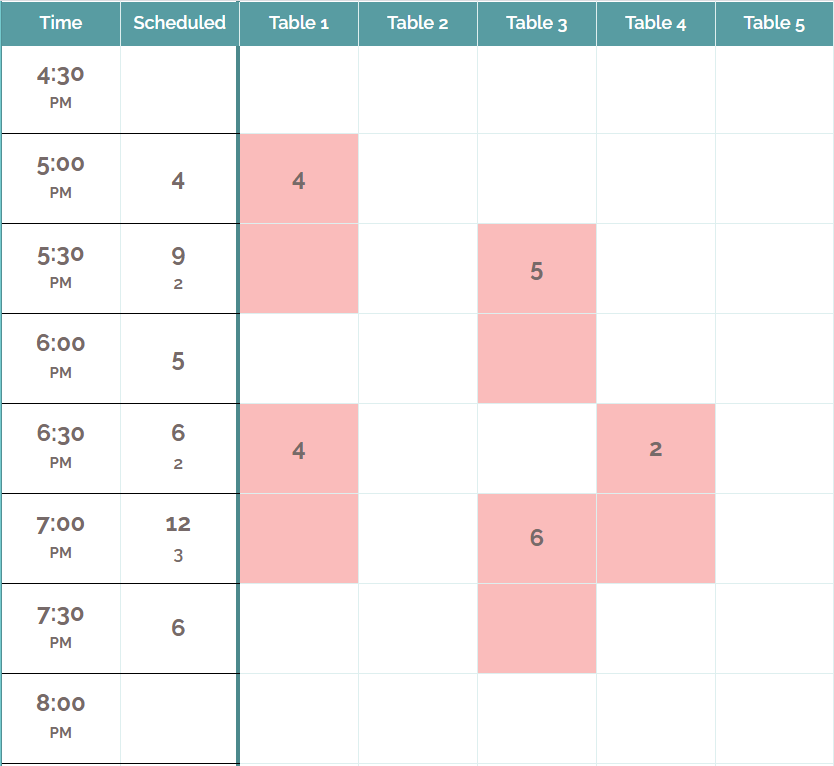
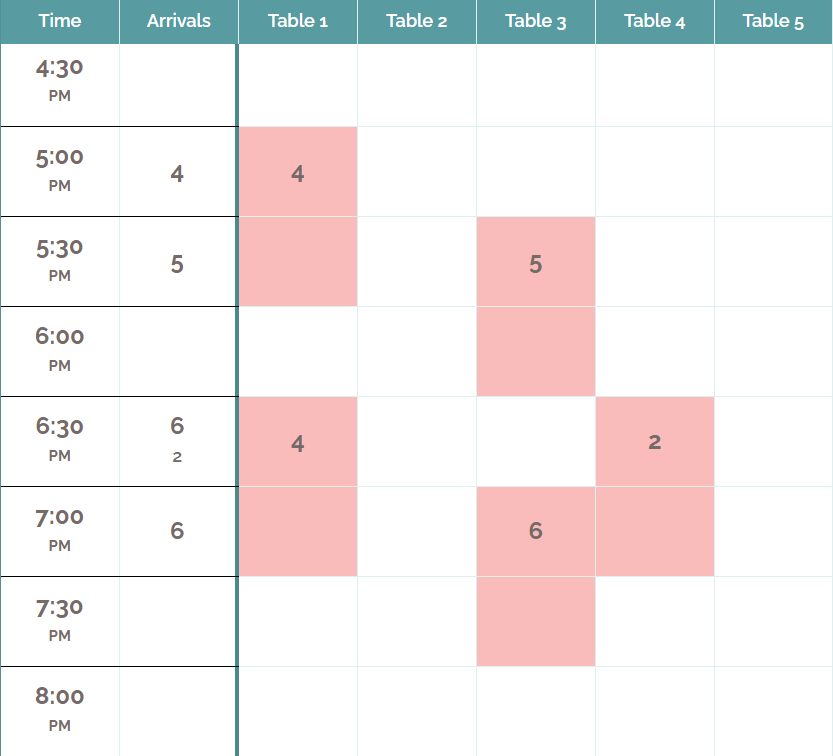
Choose to show tables as occupied either by how many parties will be arriving in a time block or by how many parties are expected to be currently seated in the time block. The Arrivals option shows the total number of people arriving, with the number of groups in smaller font below if more than one group is arriving in that time block:

The Scheduled option shows the total number of people and groups being served, regardless of when they arrived:

Some settings (including many view settings) are device-specific. These settings for how you prefer to view reservations would also need to be set on tablets you plan to use. In the tablet you can navigate to the calendar and press in any time block to see an additional option on the upper right for changing views.

A Waitlist Me Pro or Platinum subscription offers more controls for scheduling. You can set up party size limits by going to Account > Settings > Add Yourself > Input Fields. Under Size Limits, select reservations, waitlist, or both. Then you’ll see the option for minimums and maximums. There are also more scheduling features available with Business Hours, Display Hours, Scheduling Rules, and Blackout Dates. Please see this page to walk through these features. 

Wednesday, December 11th, 2019 .

With the floorplan features in Waitlist Me, it’s easy to visualize your tables and manage your sections and staff.

In Floorplan view, you’ll see all of your tables, arranged however you like. Green tables are open; red tables are occupied. You can also see how long a table has been occupied, or if it’s been reserved for a particular time. And you can tap on a table to open the action bar, where you can see details about the party, update their table’s status, clear the table when they’re done, and more.

You can also see your sections, marked with colors, dividing lines, or both. You can create custom layouts, and change these sections on the fly. Perhaps three sections is enough for a quiet lunch, but you need more for a busy evening. You can see which employee is working each section, and how many groups, and how many people, they’ve served today. You can zoom in for a closer look, and scroll across your floorplan. You can even see floorplans for other parts of your restaurant—for instance, for your patio or an upstairs meeting room. It’s all up to you.

To start building your own floorplans, just tap on the round icon to access the table management section.

Notice: Here in Grid view, you can see that I’ve already set up some basic tables. Each one has a name (in this case, the table number), and a size: the number of people it can seat. And I’ve divided those tables into sections. If you need any help with tables and sections, please see our video on “Managing Tables.”

Now, tap the button on the right, and switch to Floorplan view.

The first time you visit this page, you’ll be prompted to add a room—for instance, your main dining room. Just give your room a name, choose a portrait or landscape orientation for your floorplan, and then tap “Add.” You can add additional rooms if you like. Then, tap “Back,” to save. You can tap on the name of your room at any time, to see a different room, or to add additional rooms.

Now, tap “Edit,” to start building your floorplan. If you have not yet created your tables, just tap on the gear icon to access the table management settings, where you can manage your tables, sections, layouts, and more. Or, if you’re ready to proceed, just make sure you’ve selected the room you want to design. And then, tap “Add.”

You can choose an existing table from the list—or, add a new table at the top. (Simply give your new table a name, specify how many people it can seat, and tap Save.)

You’ll be prompted to choose the physical size, and the shape, for this table.

Now, just tap where you want your table to go. The table appears on your floorplan, along with a set of tools. You can tap and drag, to adjust your table’s position. Drag the arrows to stretch the table in a single direction. Use the double arrow to stretch your table in both directions at once. Tap the round arrows to rotate your table, by 45 degrees at a time. Tap the copy icon, and then choose an existing table or set up a new one, to make it exactly the same size and shape on your floorplan. Or, tap the dots, to edit the table’s name and size, or to delete it entirely. When you’re ready, tap anywhere else on the screen to hide these tools.

You can add as many tables as you need.

If you like, you can also use your floorplan to work with any sections and layouts you’ve defined for your restaurant. (For help setting up sections and layouts, please see our video on “Managing Tables.”)

Choose a room, and a layout. And then, tap “Add,” and choose “Element.”

You can add a dividing line—just tap to give your line a starting point, and an ending point. You can drag either of these points to adjust the angle of your line, or move the whole line to a new position. And again, tap anywhere else when you’re done.

Or, you can tap “Add,” choose “Element,” and then pick “Label.” Just choose which section this label is for. And tap on the screen to choose its position.

When your floorplan is complete, tap “Exit.” Then, tap “Yes” to save your changes.

Once you leave Edit mode, your section labels are automatically updated to show helpful details—by default, the name of the server in each section, and how many groups and individual customers they’ve served today.

Of course, you can come back to Edit Mode at any time, and update your floorplan. Or, you can modify your floorplan for another layout—for instance, to set up this same room for a different shift. Your tables remain where they are, but your lines and labels disappear, so you can set up a different set of sections for that shift. Then, you’ll be able to change your sections on the fly, as you move through your day.

Remember, you can tap the gear icon to access the settings pages for your tables, sections, and layouts.

For more options, tap “Display,” and then choose “Floorplan.” For instance, you can change the size of the text in your section labels, and decide what information those labels should include. By default, the label shows any notes for the section (for instance, the name of the server), and the total number of parties, and individual customers, who’ve been seated in that section today. But if you like, you can show the current number of open tables (and/or occupied tables) in each section, instead.

In the same way, you can decide what information should appear directly on your tables. By default, you’ll see how long each table has been occupied. But you can hide this information—or show the name of the section, instead. And if you’ve assigned colors to your tables, you can use these colors to highlight the table name (in this case, the table number), or highlight the name of the section, or not.

You can also come back to Grid view, tap “Time” at the top, and decide how to calculate the totals that will appear in the section labels on your floorplan. Would you like to see how many parties, and how many individual customers, you’ve served in each section all day, or just during the current shift? Or, would you like to see your totals for the past so many hours—from the past 1 hour, to the past 24?

Now, you’re ready to start using your floorplans. At the beginning of each shift, simply choose the appropriate layout, to instantly update your sections. Then, tap on any section label, for a list of all of your sections, and your notes on each one—in this case, the name of the server assigned there. Tap “Clear All,” fill in the servers for the new shift, and then save your changes, and you’re ready to get to work.

And remember, you can tap “Open” at the bottom, to enter split-screen mode, where you can see your floorplan, and your waitlist, at once. You can drag the handle to show more or less of the waitlist—or tap “Close” to hide it entirely and only see your floorplan.

Monday, January 29th, 2018 .

You don’t have to act like a drill sergeant to bring a touch more productivity to your 9-to-5 life. Whether you’re a manager, a department director, an executive, or a small business owner, you get more done when you aren’t waiting on things holding you up.

Waitlists aren’t just for restaurants. People waste a lot of time waiting around in business environments, even if they aren’t standing in lines. Here are four ways you can put a waitlist app to work in an office setting:

Run a help desk more efficiently

Forget about dragging equipment to a different floor or wondering if the IT guy has read your email yet. A waitlist keeps everyone in the loop and no one standing in line, laptop in hand. Your tech support can send text alerts to employees when it’s their turn, cutting down on dead time spent twiddling their thumbs.

Bonus! Waitlist Me Pro offers analytics that let you check up on different data points, like which employee is spending how much time taking care of which problem. You’ll be able to track your service times—and see if you need to adjust the schedule or size of your team, based on the hours your crew is currently clocking.

Answer “Do you have a minute?” questions

Administrators, HR, designers, unofficial office gurus—there are all sorts of people who field questions from colleagues 24/7. A waitlist gives them an easy way to help out with information requests without derailing projects and meetings.

Bonus! Our public waitlist feature lets staffers check in to see where they are in line, which means no more passive aggressive follow-up emails, check-in calls asking if you’re free in five, or awkward hovering outside your office door. Phew!

Manage office hours with managers, teams, or departments

An open-door policy is great for your office culture but not so hot for productivity. A better choice: consistent office hours. Employees will know when it’s their turn to poke their heads in for advice or project input. Got a line growing outside your office? Waitlist Me can help you wrangle it. Let employees add themselves and then chill at their desks ‘til it’s their turn, without worrying about missing their chance to meet.

Bonus! Waitlist Me works on the web as well as iOS and Android devices. That means it can go wherever you do. Use it in your office on a desktop computer, from a coffeeshop, or wherever else your job takes you.

Oversee on-site employee services and benefits

Everyone loves a perk, whether it’s on on-site yoga studio or food trucks in the parking lot every Wednesday. But sometimes, those perks come with wait times that keep employees at bay. Keep your employees happy—and enjoying the benefits that are part of their compensation package—by employing a waitlist that lets everyone have a go at the good stuff. Waitlist Me lets staffers add themselves to a list from wherever they are, whether they’re at home, on the train, or walking in from the parking deck, making it even easier for them to use the services you offer.

Bonus! With Waitlist Me, a 5-minute wait really is a 5-minute wait. Our app offers wait time estimates based on historical averages, and seeing estimated times next to actuals helps people improve their quote estimates. It’s just one more way we’re helping you and your employees use time wisely.