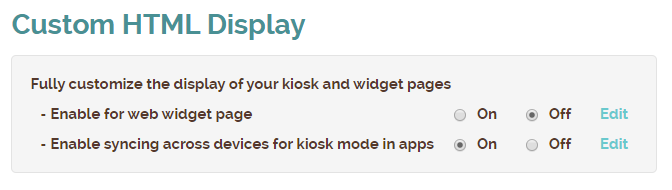
Wednesday, June 4th, 2014 .

We are happy to announce that we have lowered our NoshList Premium price with unlimited texts and calls by 59% from $49/mo to $19.99/mo. For existing NoshList Premium users, no action is required, and the new lower rate will automatically be applied with the next billing cycle.

As part of the pricing update we will be changing our free service, which will be limited to 100 parties a month starting July 1, 2014. The hundred party limit will be based on each calendar month, and when the limit is reached, further parties will not be able to be added until the beginning of the next month.

NoshList Premium gives every restaurant unlimited usage of all these features:

– Unlimited text messages and phone call notifications to diners
– Add, remove and seat any number of parties quickly and easily
– Integrated table assignment and management
– Customizable notifications and public waitlist page
– Powerful analytics and downloadable reports
– Customizable quick notes and statuses
– Multi-device syncing
– Guest loyalty tracking
– Multi-place and multi-user management

If you haven’t already, sign in and get the upgrade here for $19.99/mo. to start getting all these features.

Wednesday, July 12th, 2017 .

Waitlist Me has a Web Widget feature that allows customers to add themselves to the waitlist or schedule reservations from your website or social page. Waitlist Me Pro offers some additional features for controlling when customers can do these actions:

* Business Hours lets you restrict the times that people can make reservations or appointments

* Display Hours limit the times the widget itself will be available for people to join the waitlist or request reservations

To set these up, go to the Add Yourself area of the settings in the app or on the Waitlist Me website (login online and navigate to Account > Settings > Add Yourself > Business Hours and Display Hours).


Business Hours

Set your business hours for when you wish to accept reservations. For example, if your business closes at 10:00 pm, you may not want to accept reservations after 9:00 pm. When customers try to book outside of that time, they will receive a message instructing them which time frames are available (you can edit this message). There are also options to limit group size and how many days out reservations can be made.


Display Hours

The Display Hours feature controls when this widget is available, so people don’t add themselves to the waitlist when you aren’t open or send reservation requests when you are not around to review them. You can also choose what message will appear when the widget isn’t active.


There are several other settings you can edit to get the most out of your subscription. Navigate to Account > Settings > Customize Settings (under the Add Yourself header), and here you can change the colors and titles of your Web Widget. The Display dropdown controls the metrics customers see for the current waitlist (number of people on the list, last time quoted, etc.).

In the General Settings section, there are options you can customize in the Add Yourself settings. for whether you want to accept requests for reservations and/or the waitlist, whether you want to automatically approve those requests.  You can also choose what information you want to collect and require, like phone number, party size, and notes.

After configuring your widget, you’re ready to put it on your website. You can either add a link that will redirect to a hosted webpage, or add the widget itself directly onto your site.  Also, you can enter HTML that will appear below the widget. For example, you may want to include instructions for customers to indicate if they prefer to sit inside or outside, or information about your loyalty program.  Here is a video with more on how it works:


Wednesday, April 28th, 2021 .

Waitlist Me offers several methods for calculating and displaying estimated wait times to help improve quote accuracy. The default option provides a rolling average wait that is recalculated every time a party is checked off the waitlist by being marked as served. You can choose a time period to include in this average, from 1 – 24 hours. Three group size ranges can be customized for displaying these averages. These settings are in the app under the gear icon > Customization > Waitlist View > Wait Estimates.

With Pro and Platinum subscriptions, there are advanced features to help you estimate wait times based on party size and time of day. The calculations can be set to use the previous week or previous four weeks of data for parties served. To enable this option, select Historical for the Calculations option from the menu shown above. Then you can access the data any time by pressing on the Avg Wait option from the main waitlist screen. (These settings can be accessed again quickly by selecting Historical on the main waitlist screen.)

The Waitlist Me iPad and Android tablet apps let you view graphs and charts that average the data for the previous week or four weeks, which makes it easy to spot trends over time. Use the menus at the top to switch between days of the weeks and various group views. This view shows a breakout of group ranges: 

While the combined view gives a historical waits that includes all group sizes:

If the data shows you consistently have waits for specific group sizes, it may be beneficial to remove some of the lesser used table sizes and add more to accommodate the group sizes that usually wait the longest. These metrics can help you plan future staffing so you can ensure coverage for the busiest times. Beyond helping with the real-time process of providing more accurate wait estimates, reducing walkaways, and improving customer satisfaction, the data can be used for strategic analysis and improvements.

Friday, December 9th, 2016 .

happy-customers

Add more magic in the holiday season by giving your customers the precious gift of time. Lines are always longer this time of year, and painful waits just frustrate customers.  You can improve the waiting experience for your customers by using Waitlist Me. This simple to use app can not only track who is on the waitlist, but also helps employees to give more accurate wait time estimates than a paper list.

Waitlist Me is being used successfully to drive more revenues across many retail segments.

Selling phones and setting up calling plans take a lot of time, tying up service representatives and frustrating customers who are waiting to be helped. Don’t lose those customers. Greet them and add them to Waitlist Me, so they can roam the store to choose phone cases, screen protectors, and other items while waiting.  It’s a smart way to reduce walkaways while increasing sales.

Businesses selling electronics have customers that may need more personalized service to help them choose the right television or computer, yet they don’t always know who to ask for help. Don’t let them walk out the door frustrated.  Make sure to get an idea of what they need and assure them they will be helped soon.  Customers have more patience when they are given an accurate quote of how long it will be until the right person is available to help them.

Shopping for clothes can involve a different type of waiting frustrations, and long lines for dressing rooms and checking out can scare away customers.  Add them to a waitlist, so they can continue shopping and grab more items to try on and buy. This is a really easy way to drive incremental sales.

Waitlist Me can improve customer shopping experiences in all kinds of retail environments, from shoe stores to jewelry counters to children waiting to see Santa. Providing exceptional service means happier customers.  Plus, more time to shop while waiting means more sales. Do your part to reduce stress and make the holidays brighter for your customers.  Use Waitlist Me!

Tuesday, October 6th, 2015 .

The new web widget makes it easy for customers to add themselves to your waitlist from your website and have their waitlist requests appear in the Waitlist Me app.  The widget has two main views and is simple to customize and add to your site in a few quick steps.

Customers can view estimated wait times or people waiting:

widget1


Customers can then submit their info for adding themselves to the list:

widget2


Creating the widget is as easy as switching the toggle to “ON” from your widget settings page on the Waitlist Me website. A unique widget will be created and all you need to do is copy the line of code onto your website where you’d like the widget to display.

The widget can be customized at any time, and you will see how it looks in the preview section at the top of the page. Press “Save” to keep changes and automatically update the widget on your site. Here are some of the options:

Titles – Change the text that appears on the two different screens of the widget. The first screen shows the estimated wait and the second screen appears after customers click to add themselves and enter their information

Colors – Match the widget to your website the way you like with the flexibility to change the colors of the text, background, borders, and links.

Display types – There are a couple options on what you may want to display to give people a feel of how long the wait might be, or if you choose “None” it will not show the view of the wait estimate at all and just have the fields for people to add their information.

Also, if you want to go back to the default settings after you can always click the Reset link at the bottom.

widget-settings


The web widget is a Waitlist Me Premium feature and adds another option beyond using the public waitlist page for customers to add themselves to the waitlist.