Sunday, June 22nd, 2014 .

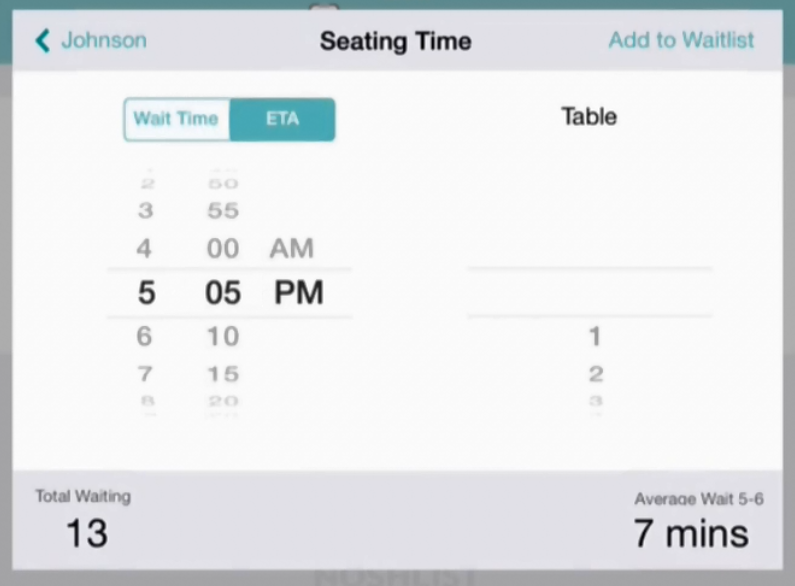
Want to improve how efficiently you do table management? NoshList makes it easy to assign parties to tables, either when they are first added to the list or when they are seated. The table numbers are displayed in the waitlist view, so you can scan the list at a glance and know which parties go where.

table eta


Table numbers appear in a spinner for quick selection, and by default the numbers will be from 1 to 50. Most restaurants will want to change these numbers to match what they use in their restaurant, and this can be done individually in the app, or all at once on the NoshList website.

If you aren’t a restaurant, you can even change table numbers to represent what makes sense for your business. Think of them like a resource that can be assigned to a customer. They could represent the initials of a salonist or salesperson, a number for a barber chair or bowling alley lane, a rental rental ID or code, among others.

You can edit Tables in the app settings individually:

tables app


Or you can update them all at once in the settings on the NoshList website. If you have multiple devices the changes will synch so they are the same across all devices, but you will need to just go to the settings page on the other devices to trigger the sync.

tables web

Sunday, February 8th, 2026 .

Running a busy restaurant is a balancing act. You want to fill every seat, but you also need to keep your best tables open for VIPs or ensure your staff isn’t overwhelmed by a sudden rush in one single section. Our new Availability and Priority feature gives you the tools to automate your seating strategy exactly how you want it.

Control Your Online Bookings

Not every table needs to be available for online booking. With the Availability setting, you decide which tables the system can auto-assign to self-service customers and which ones you want to hold back for walk-ins or special manual assignments. It’s the easiest way to protect your “power tables” or manage capacity during peak shifts.

Smart Auto-Assignment

When a reservation comes in, who gets the best seat? With Priority, you set the rules.

  • Priority 1 tables are filled first.
  • Higher numbers act as a fallback.
  • Priority 0 keeps tables hidden until every other option is exhausted.

Strategies That Work

Whether you want to fill your most popular window seats first, keep a section clear for a private event, or spread guests evenly across the room to balance the workload for your servers, this feature handles the logic for you.

Getting Started

Ready to optimize your seating? Just head to Account → Settings → Availability and Scheduling → Advanced Scheduling Rules to start setting your priorities.

Wednesday, December 11th, 2019 .

With the floorplan features in Waitlist Me, it’s easy to visualize your tables and manage your sections and staff.

In Floorplan view, you’ll see all of your tables, arranged however you like. Green tables are open; red tables are occupied. You can also see how long a table has been occupied, or if it’s been reserved for a particular time. And you can tap on a table to open the action bar, where you can see details about the party, update their table’s status, clear the table when they’re done, and more.

You can also see your sections, marked with colors, dividing lines, or both. You can create custom layouts, and change these sections on the fly. Perhaps three sections is enough for a quiet lunch, but you need more for a busy evening. You can see which employee is working each section, and how many groups, and how many people, they’ve served today. You can zoom in for a closer look, and scroll across your floorplan. You can even see floorplans for other parts of your restaurant—for instance, for your patio or an upstairs meeting room. It’s all up to you.

To start building your own floorplans, just tap on the round icon to access the table management section.

Notice: Here in Grid view, you can see that I’ve already set up some basic tables. Each one has a name (in this case, the table number), and a size: the number of people it can seat. And I’ve divided those tables into sections. If you need any help with tables and sections, please see our video on “Managing Tables.”

Now, tap the button on the right, and switch to Floorplan view.

The first time you visit this page, you’ll be prompted to add a room—for instance, your main dining room. Just give your room a name, choose a portrait or landscape orientation for your floorplan, and then tap “Add.” You can add additional rooms if you like. Then, tap “Back,” to save. You can tap on the name of your room at any time, to see a different room, or to add additional rooms.

Now, tap “Edit,” to start building your floorplan. If you have not yet created your tables, just tap on the gear icon to access the table management settings, where you can manage your tables, sections, layouts, and more. Or, if you’re ready to proceed, just make sure you’ve selected the room you want to design. And then, tap “Add.”

You can choose an existing table from the list—or, add a new table at the top. (Simply give your new table a name, specify how many people it can seat, and tap Save.)

You’ll be prompted to choose the physical size, and the shape, for this table.

Now, just tap where you want your table to go. The table appears on your floorplan, along with a set of tools. You can tap and drag, to adjust your table’s position. Drag the arrows to stretch the table in a single direction. Use the double arrow to stretch your table in both directions at once. Tap the round arrows to rotate your table, by 45 degrees at a time. Tap the copy icon, and then choose an existing table or set up a new one, to make it exactly the same size and shape on your floorplan. Or, tap the dots, to edit the table’s name and size, or to delete it entirely. When you’re ready, tap anywhere else on the screen to hide these tools.

You can add as many tables as you need.

If you like, you can also use your floorplan to work with any sections and layouts you’ve defined for your restaurant. (For help setting up sections and layouts, please see our video on “Managing Tables.”)

Choose a room, and a layout. And then, tap “Add,” and choose “Element.”

You can add a dividing line—just tap to give your line a starting point, and an ending point. You can drag either of these points to adjust the angle of your line, or move the whole line to a new position. And again, tap anywhere else when you’re done.

Or, you can tap “Add,” choose “Element,” and then pick “Label.” Just choose which section this label is for. And tap on the screen to choose its position.

When your floorplan is complete, tap “Exit.” Then, tap “Yes” to save your changes.

Once you leave Edit mode, your section labels are automatically updated to show helpful details—by default, the name of the server in each section, and how many groups and individual customers they’ve served today.

Of course, you can come back to Edit Mode at any time, and update your floorplan. Or, you can modify your floorplan for another layout—for instance, to set up this same room for a different shift. Your tables remain where they are, but your lines and labels disappear, so you can set up a different set of sections for that shift. Then, you’ll be able to change your sections on the fly, as you move through your day.

Remember, you can tap the gear icon to access the settings pages for your tables, sections, and layouts.

For more options, tap “Display,” and then choose “Floorplan.” For instance, you can change the size of the text in your section labels, and decide what information those labels should include. By default, the label shows any notes for the section (for instance, the name of the server), and the total number of parties, and individual customers, who’ve been seated in that section today. But if you like, you can show the current number of open tables (and/or occupied tables) in each section, instead.

In the same way, you can decide what information should appear directly on your tables. By default, you’ll see how long each table has been occupied. But you can hide this information—or show the name of the section, instead. And if you’ve assigned colors to your tables, you can use these colors to highlight the table name (in this case, the table number), or highlight the name of the section, or not.

You can also come back to Grid view, tap “Time” at the top, and decide how to calculate the totals that will appear in the section labels on your floorplan. Would you like to see how many parties, and how many individual customers, you’ve served in each section all day, or just during the current shift? Or, would you like to see your totals for the past so many hours—from the past 1 hour, to the past 24?

Now, you’re ready to start using your floorplans. At the beginning of each shift, simply choose the appropriate layout, to instantly update your sections. Then, tap on any section label, for a list of all of your sections, and your notes on each one—in this case, the name of the server assigned there. Tap “Clear All,” fill in the servers for the new shift, and then save your changes, and you’re ready to get to work.

And remember, you can tap “Open” at the bottom, to enter split-screen mode, where you can see your floorplan, and your waitlist, at once. You can drag the handle to show more or less of the waitlist—or tap “Close” to hide it entirely and only see your floorplan.

Friday, July 17th, 2020 .

Our table management and resource management tools help businesses track availability and the time customers spend at their business.  When assigning customers to a table or resource or moving customers between resources we have had a pop up for choosing from a list of assignments in some of our views.  In some cases this is a quick and effective method, but other times it may be easier to select a table from the floorplan view or a resource from the grid view, so we have added a new tap to add option that switches to these views for selection.  We have also optimized the action bar in the process to make it easier to view information on customers waiting for or occupying a resource and perform key actions like clearing, serving, and moving.

When you select an open table the action bar at the bottom will show the name & size, and the Add button will allow you to choose a party from the waitlist to assign to this resource. 

After a party is assigned to a table, tapping on that table will allow you to mark that customer as served (checking them off the waitlist), and show the table as occupied. 

Once a party is seated, tapping on their table will bring up an action bar to display the party’s name, size, and how long they have been there. Pressing the Current button will give options to move the party to another table, or clear that resource to mark it as available. You can also clear a party from a table by pressing their current ‘Taken’ status on the left of the action bar and selecting ‘Open.’

On the waitlist screen there are new options for assigning a party to a table. If you press in the Assign column for a party, you’ll see a list of tables that you can assign the party to. There will also be a new button at the top right of this menu, for Grid or Floor (depending on what view you’re using). Pressing that button would take you to the grid or floor view, where you could then tap on a table to assign the party. 

Once you choose Grid or Floor, the app will remember your selection and default you to that for future selections. The Floor/Grid button on the upper right will switch between those two views. If you prefer the list of tables, just choose Use Pop-up on the upper left. For the floorplan view, if you have more than one room you will also see your menu on the upper right to switch between rooms. 

When assigning a party to multiple tables, just press and hold the first one and then you will be able to select more. Press Done on the upper right to finish assigning multiple tables.

Wednesday, March 16th, 2016 .

We are happy to announce the opening of a new headquarters in Charleston, South Carolina.  Waitlist Me started in the Silicon Valley by former Google employees as NoshList, a popular restaurant app, and expanded to serve businesses across multiple industries.  As part of the company’s aggressive growth plans, Waitlist Me considered a wide range of options and was attracted to Charleston for a number of reasons.

“Charleston is a true hidden gem for tech start ups,” said Brian Hutchins, Waitlist Me CEO, “When you consider the beauty of the area and all the things the city has to offer, it is hard to beat the quality of life, and that is a key strategic advantage in attracting and retaining top talent.  Furthermore, smart investments made in infrastructure and programs to support business innovation are starting to pay dividends in Charleston, and the local tech economy is evolving rapidly. Waitlist Me has an office at the Charleston Digital Corridor, is part of the Harbor’s Propel accelerator program, and will be exhibiting at the DigSouth.  These are a few examples of very valuable initiatives that have come into their own relatively recently.”

To celebrate the occasion, the company will be giving away a free year of its Premium service to ten Charleston businesses that need it most, based on suggestions from locals.  The offer is designed to raise awareness around how technology can improve wait experiences in Charleston.  It also opens up ways for the broader community to engage and share ideas.  Many businesses are still struggling by using paper or clunky buzzer systems, and don’t realize there are better ways to manage their waits.  People that visit these places feel the pain though.  Nominating a business for the prizes is as simple as visiting www.waitlist.me/charleston and sharing a business name and experience that could be improved.

Charleston is well known for its hospitality, and Waitlist Me is tool local businesses can use to help offer the exceptional level service that makes it a top tourist destination as well as a great place to live.  Instead of just standing around bored or frustrated, waiting customers could take a nice stroll, experience more of the city, shop, and more.  It’s a win-win for everyone, and we are hoping people will help us spread the word.