We are happy to announce the winners of our special giveaway for Charleston area businesses that we did as part of the opening of our Charleston headquarters. Charlestonians were invited to submit names of local businesses that they’d be happier visiting if the wait wasn’t so bad. In turn, Waitlist Me would select the top 10 submissions to provide a free year of the Waitlist Me service to help improve their wait experience.
Here are a couple of our favorite submissions:
“This is the best brunch/breakfast/lunch on Folly Beach. The wait is consistently 30-45 minutes, no matter when you visit, and there isn’t really a great waiting area, so most people have to stand in the parking lot.” – Lost Dog Café customer
“I love Hyman’s, but it is so crowded in the summer and tourist seasons. I think locals like me would go there more often if the lines weren’t so bad or there was a better way to know when its your turn” – Hyman’s Seafood customer
“They’re the BEST brunch spot in the area…and they do an awesome dinner service as well. They take reservations, but it’s really tough to walk in and get a spot.” – High Thyme customer
And here is the full list of winners:
167 Raw
High Thyme
Hymann’s Seafood
Kaminsky’s
Laura Albert’s
Lost Dog Café
Old South Carriage Co.
Page’s Okra Grill
Taco Boy
Tavern & Table
Customers are feeling the pain of having to wait, and businesses can use Waitlist Me to dramatically improve this experience. Waitlist Me makes it easy to manage a waitlist and send customers text notifications when ready for them, allowing customers the freedom to walk around and enjoy more of the beauty of Charleston while they wait.
The Waitlist Me widget allows customers to add themselves to the waitlist and reservations. It is convenient for customers and saves you the time of having to take down information over the phone.
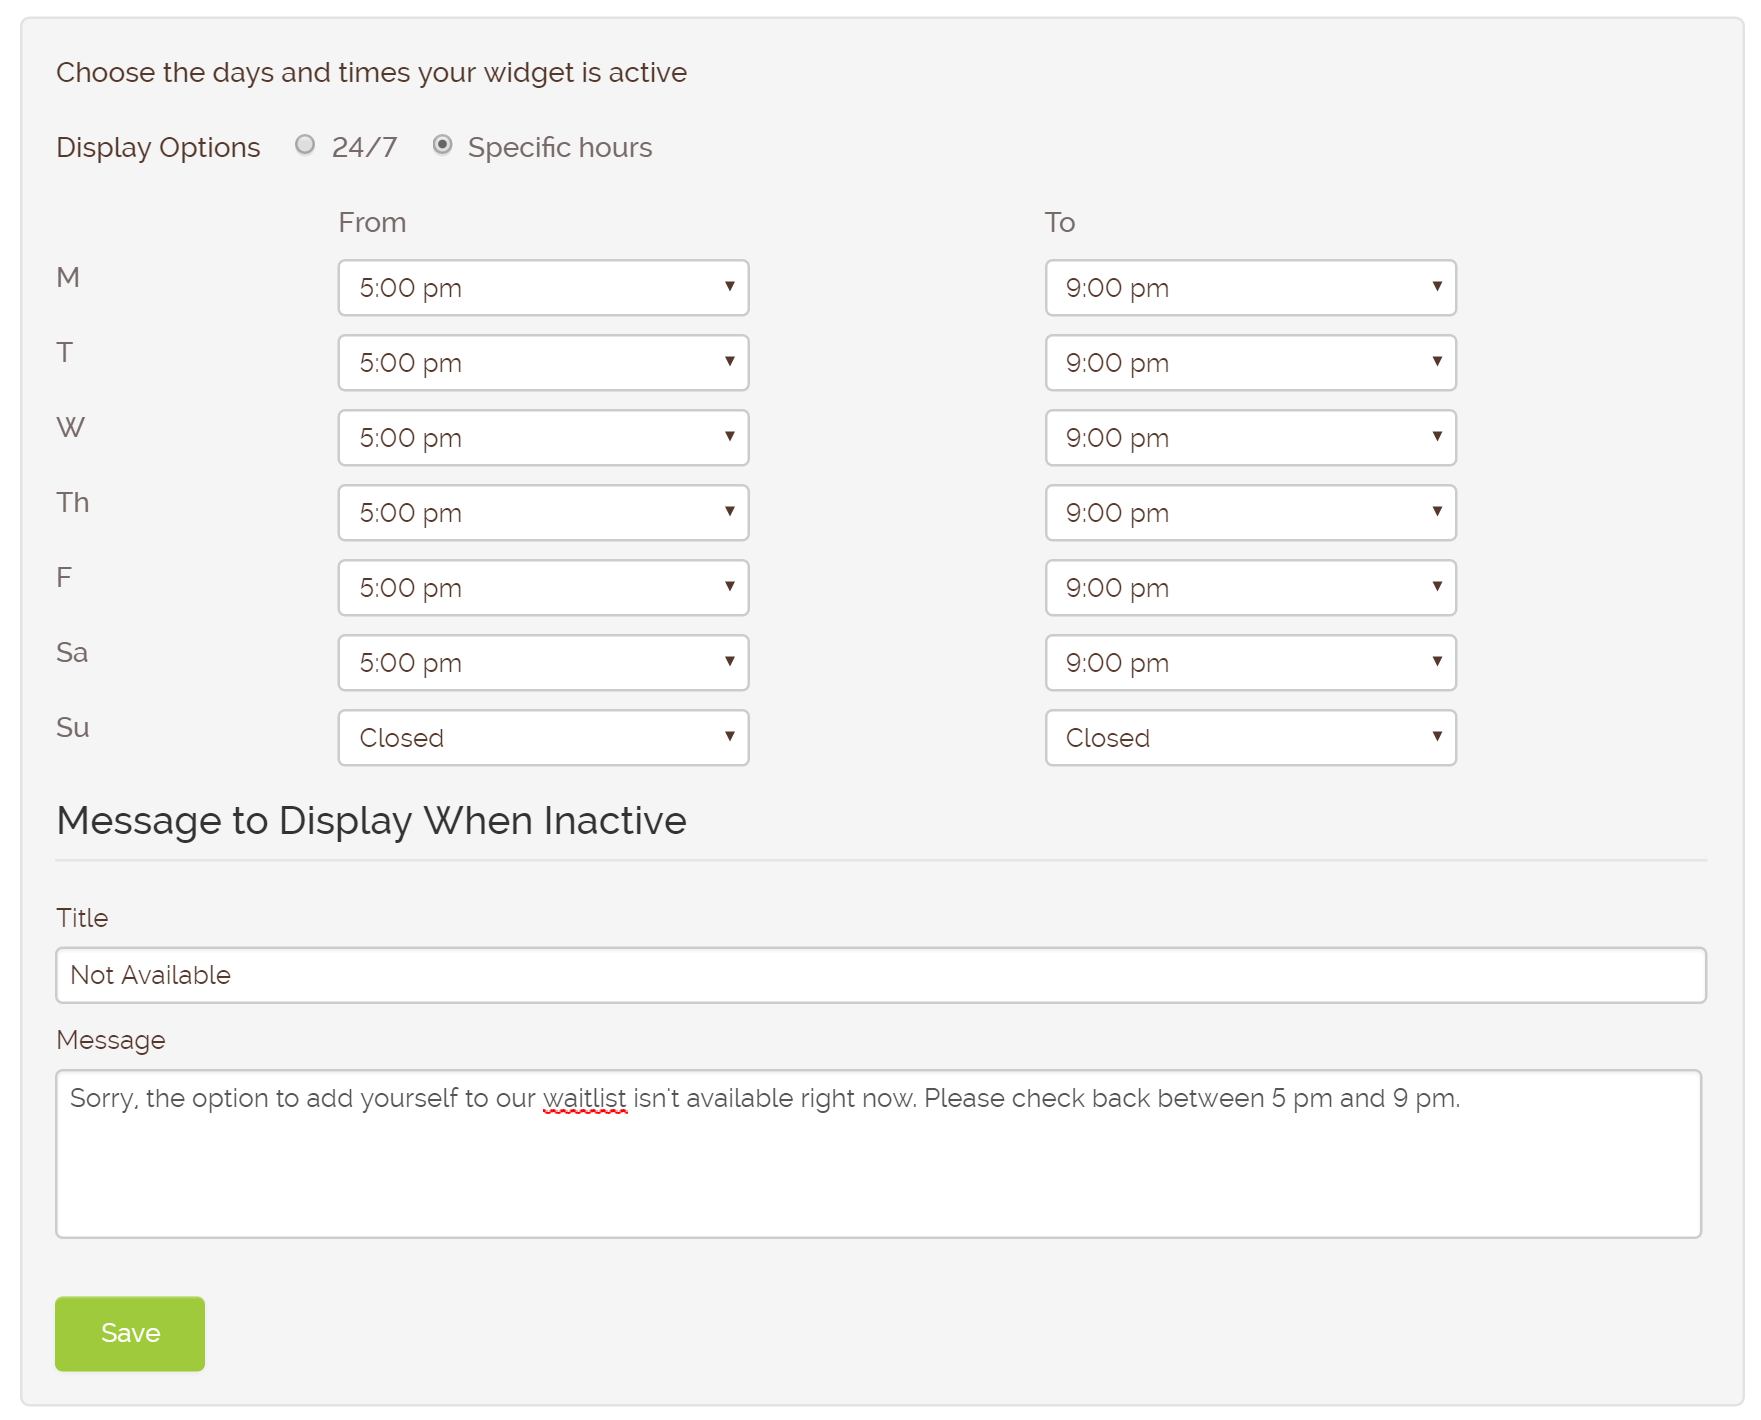
Whether you choose to have customer requests automatically approved or pending an approval step in the Waitlist Me app, we have a new feature that you can use to limit when these requests can be made. This helps avoid confusion where a customer might try to add themselves to the waitlist when you are closed or not taking waitlist requests.
Now you can decide if you’d like the widget to take requests all the time with the “24/7” option or you can set the days and times that it would do so. During the times that you choose to take requests the widget would display as it normally does. During other times it would show a message you can customize on not being available at that time.
The new widget time display settings are part of the Waitlist Me Pro service.
Waitlist Me has a couple options for allowing customers to add themselves to the waitlist and reservations. It also offers variety of ways to customize the process to the needs of different businesses.
A few months ago we released a web widget that businesses can easily add to their websites. Many businesses told us how much they liked the new widget. As part of the feedback we received, we found ways we could make implementing and using the new widget even simpler, and we added an option to use the widget on a hosted page.
The new widget page allows businesses to just link to their unique URL from a website, blog, email, or whatever. The widget page is easier for less tech savvy businesses, and there is no need to involve a web developer to make sure it is added correctly to the website.
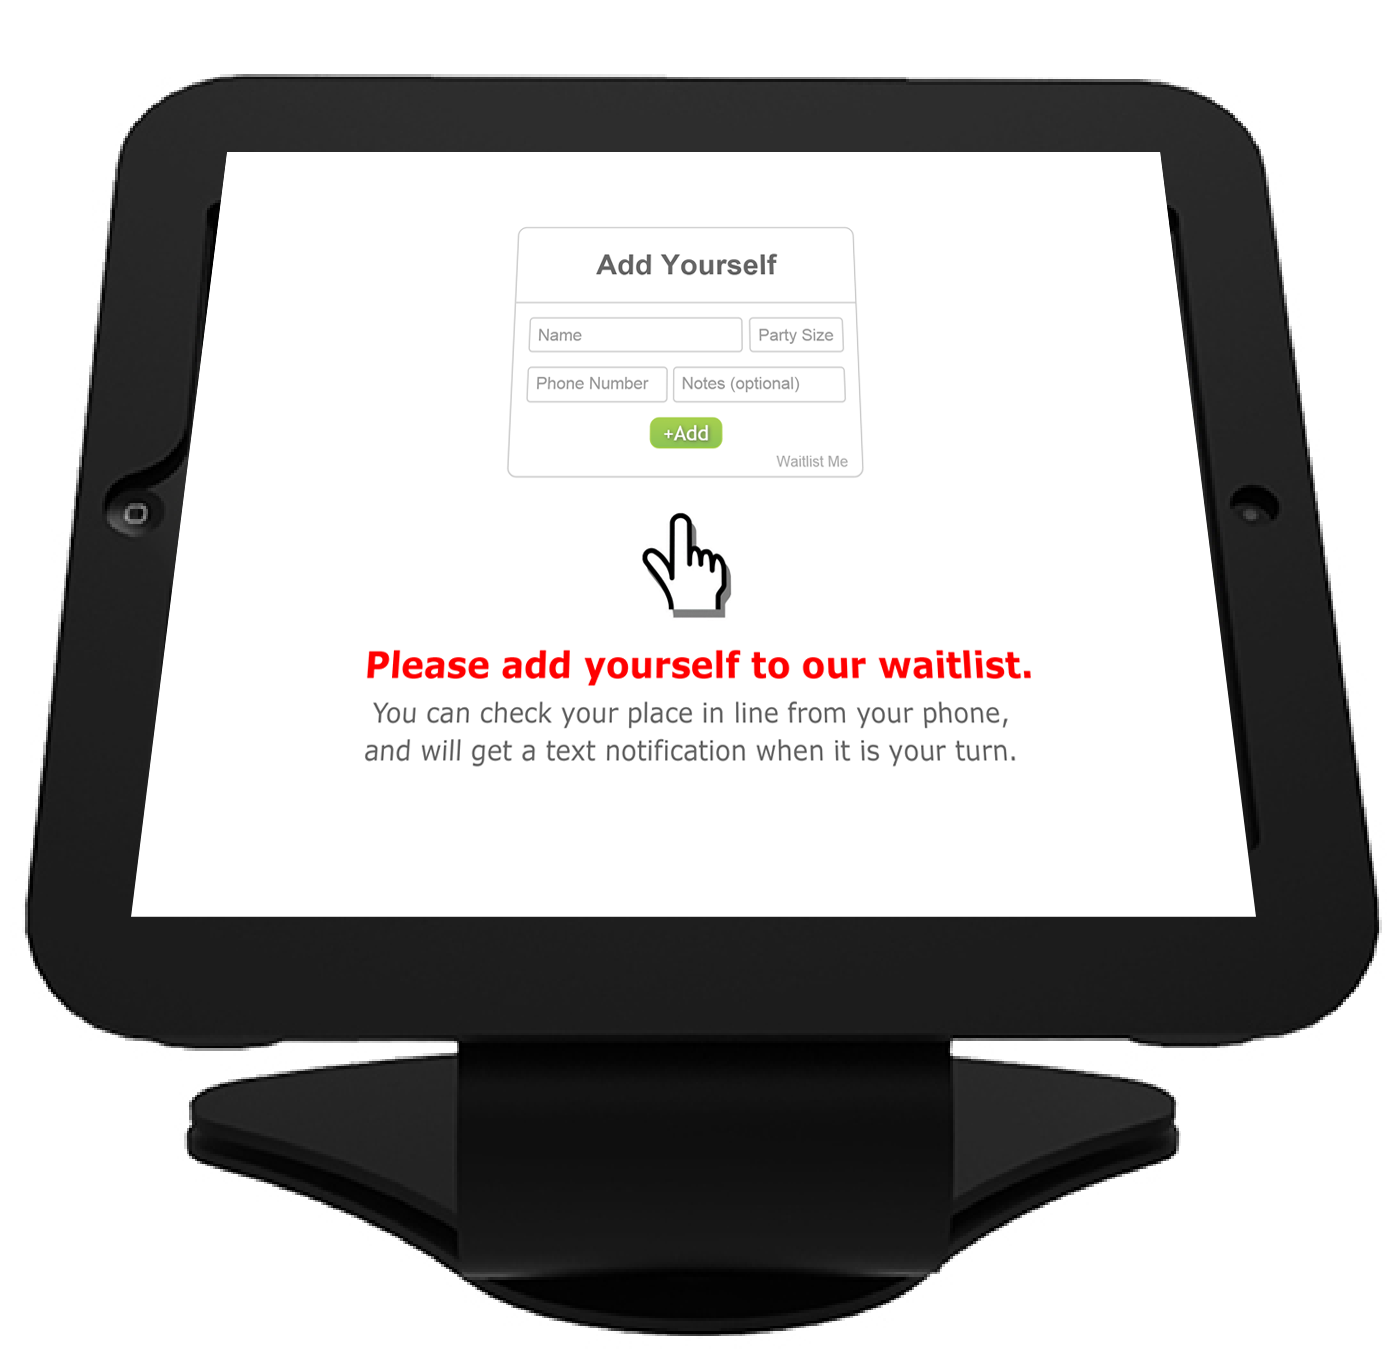
The widget page is also especially well-suited for businesses that allow people to add themselves to the list when they arrive at the business. All you have to do is put the URL into the browser of any tablet and you have your own check-in station. By setting the widget option to only show the “Add Yourself” screen, and not the estimated wait you might show on a website, it simplifies the page even further. You can also add custom instructions and images to the bottom of the page for more clarity.
When asking customers to enter themselves, the simpler you make the interface, the less chances there are for mistakes and frustration. The hosted widget page makes it easy for your customers to add themselves, which makes it easier for you.
We are happy to announce the opening of a new headquarters in Charleston, South Carolina. Waitlist Me started in the Silicon Valley by former Google employees as NoshList, a popular restaurant app, and expanded to serve businesses across multiple industries. As part of the company’s aggressive growth plans, Waitlist Me considered a wide range of options and was attracted to Charleston for a number of reasons.
“Charleston is a true hidden gem for tech start ups,” said Brian Hutchins, Waitlist Me CEO, “When you consider the beauty of the area and all the things the city has to offer, it is hard to beat the quality of life, and that is a key strategic advantage in attracting and retaining top talent. Furthermore, smart investments made in infrastructure and programs to support business innovation are starting to pay dividends in Charleston, and the local tech economy is evolving rapidly. Waitlist Me has an office at the Charleston Digital Corridor, is part of the Harbor’s Propel accelerator program, and will be exhibiting at the DigSouth. These are a few examples of very valuable initiatives that have come into their own relatively recently.”
To celebrate the occasion, the company will be giving away a free year of its Premium service to ten Charleston businesses that need it most, based on suggestions from locals. The offer is designed to raise awareness around how technology can improve wait experiences in Charleston. It also opens up ways for the broader community to engage and share ideas. Many businesses are still struggling by using paper or clunky buzzer systems, and don’t realize there are better ways to manage their waits. People that visit these places feel the pain though. Nominating a business for the prizes is as simple as visiting www.waitlist.me/charleston and sharing a business name and experience that could be improved.
Charleston is well known for its hospitality, and Waitlist Me is tool local businesses can use to help offer the exceptional level service that makes it a top tourist destination as well as a great place to live. Instead of just standing around bored or frustrated, waiting customers could take a nice stroll, experience more of the city, shop, and more. It’s a win-win for everyone, and we are hoping people will help us spread the word.
Building on the set of resource management features we rolled out a couple months ago, we have added more flexibility for creating and tracking custom resource statuses. These statuses can be used to visually highlight different stages of your occupied resources in different colors to help make assignment decisions faster and easier.
Here is a new video on resource management, including the new custom statuses:
For example, say you are managing restaurant tables and using Waitlist Me to view what tables are available or occupied. You can sort tables by the times they have been occupied for a better sense of which ones will become available first. Now with custom statuses you could improve on those estimates even more by changing the states of tables that are waiting for their bill or being cleaned. Marking tables with customers waiting for their checks as “billing” can give your bus boys a heads up on which tables would need cleaning soon. Similarly, you can change the status of tables to “cleaning” when they are being cleared and prepped. Using more detailed statuses can help your staff at the front of the house know what tables will be available soon, which means they can quote better wait time estimates and seat customers faster. This means more revenue for the restaurant through more table turns and improved customer satisfaction.
This is just one example of how it might work in a restaurant, but the flexibility of the naming and usage of statuses means they can be tailored to different processes in different businesses.
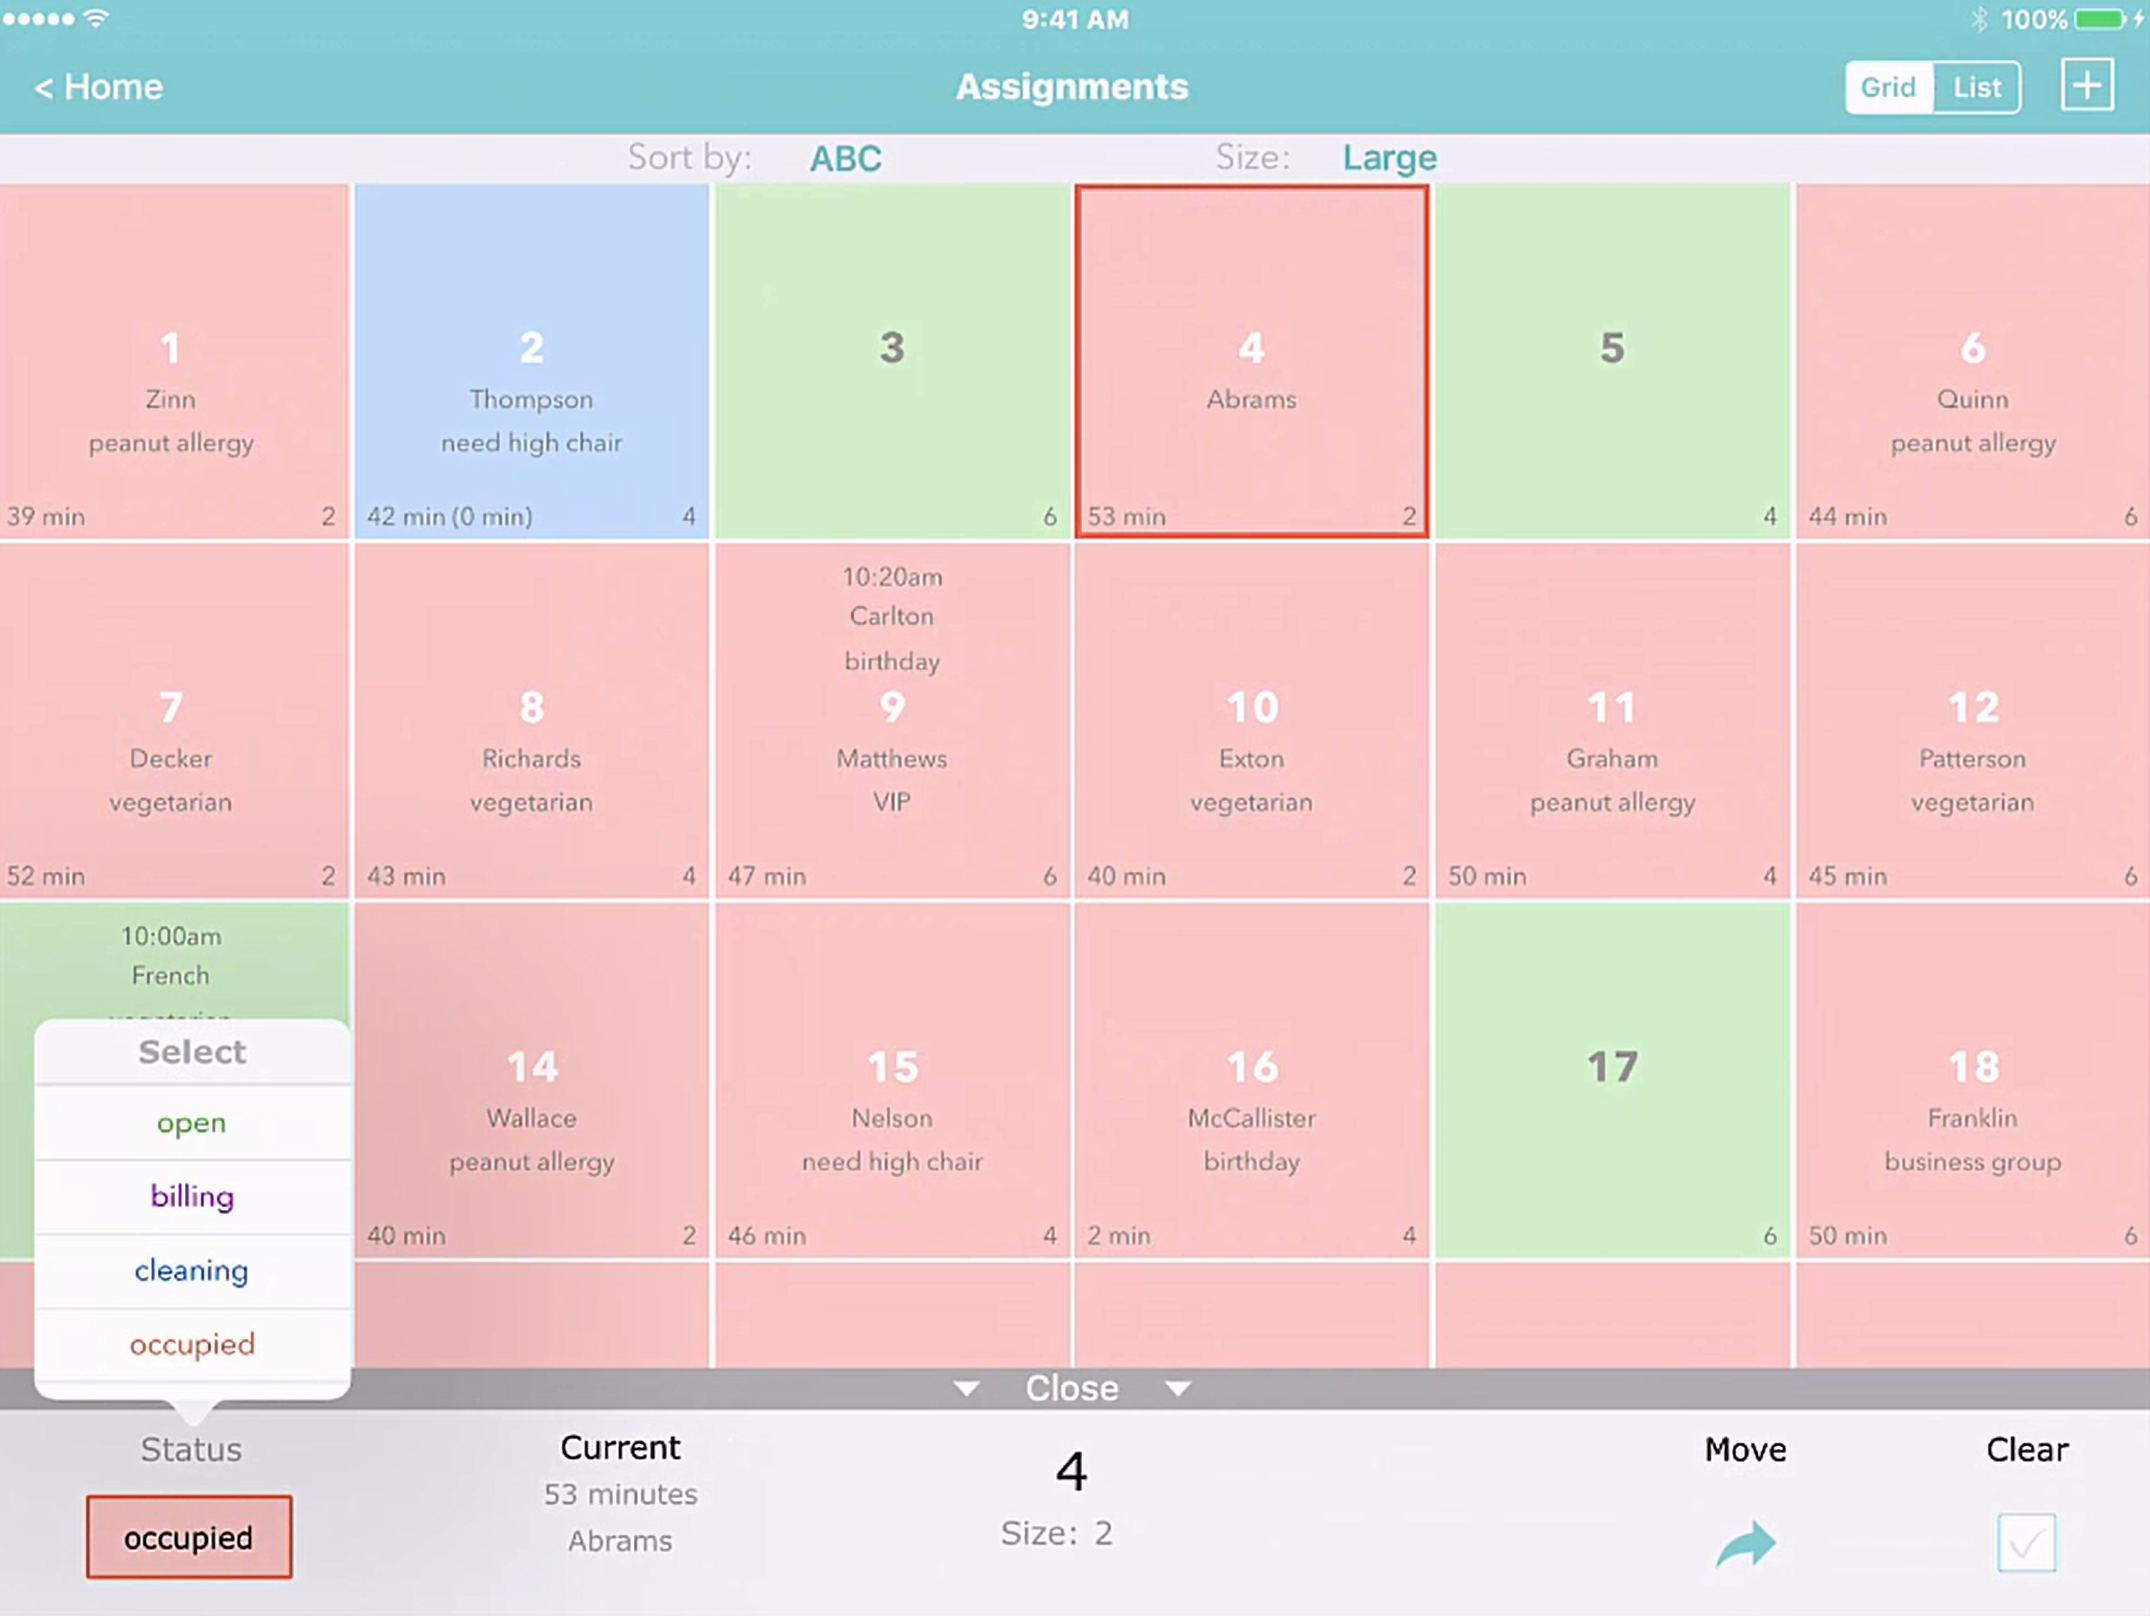
To change a status in Waitlist Me, all you have to do is press on the resource and an action bar will appear at the bottom of the screen. This area shows information on customers currently occupying and waiting for the resource, and has actions for moving and clearing customers. Pressing on the status on the left will bring up a list of statuses, and selecting one will change the status and color of the resource. In the list view, just tap on the status color to change it.
Note that when you choose a custom status you can see both the total time a resource has been occupied as well as the time spent in the current status, which is shown in parenthesis. This makes it easy to see total visit times and times in specific statuses at a glance, so you can tell if a certain stage is causing more delays than others and how that might be affecting total wait times.
Accompanying the custom statuses are a couple of new sorting options in the Grid view, where you can view your resources grouped by Status. Select “Status the ABC” to have all the statuses grouped together and then ordered alphabetically by the resource name or “Status then Time” to have them ordered by the length of time they have been in that particular status.
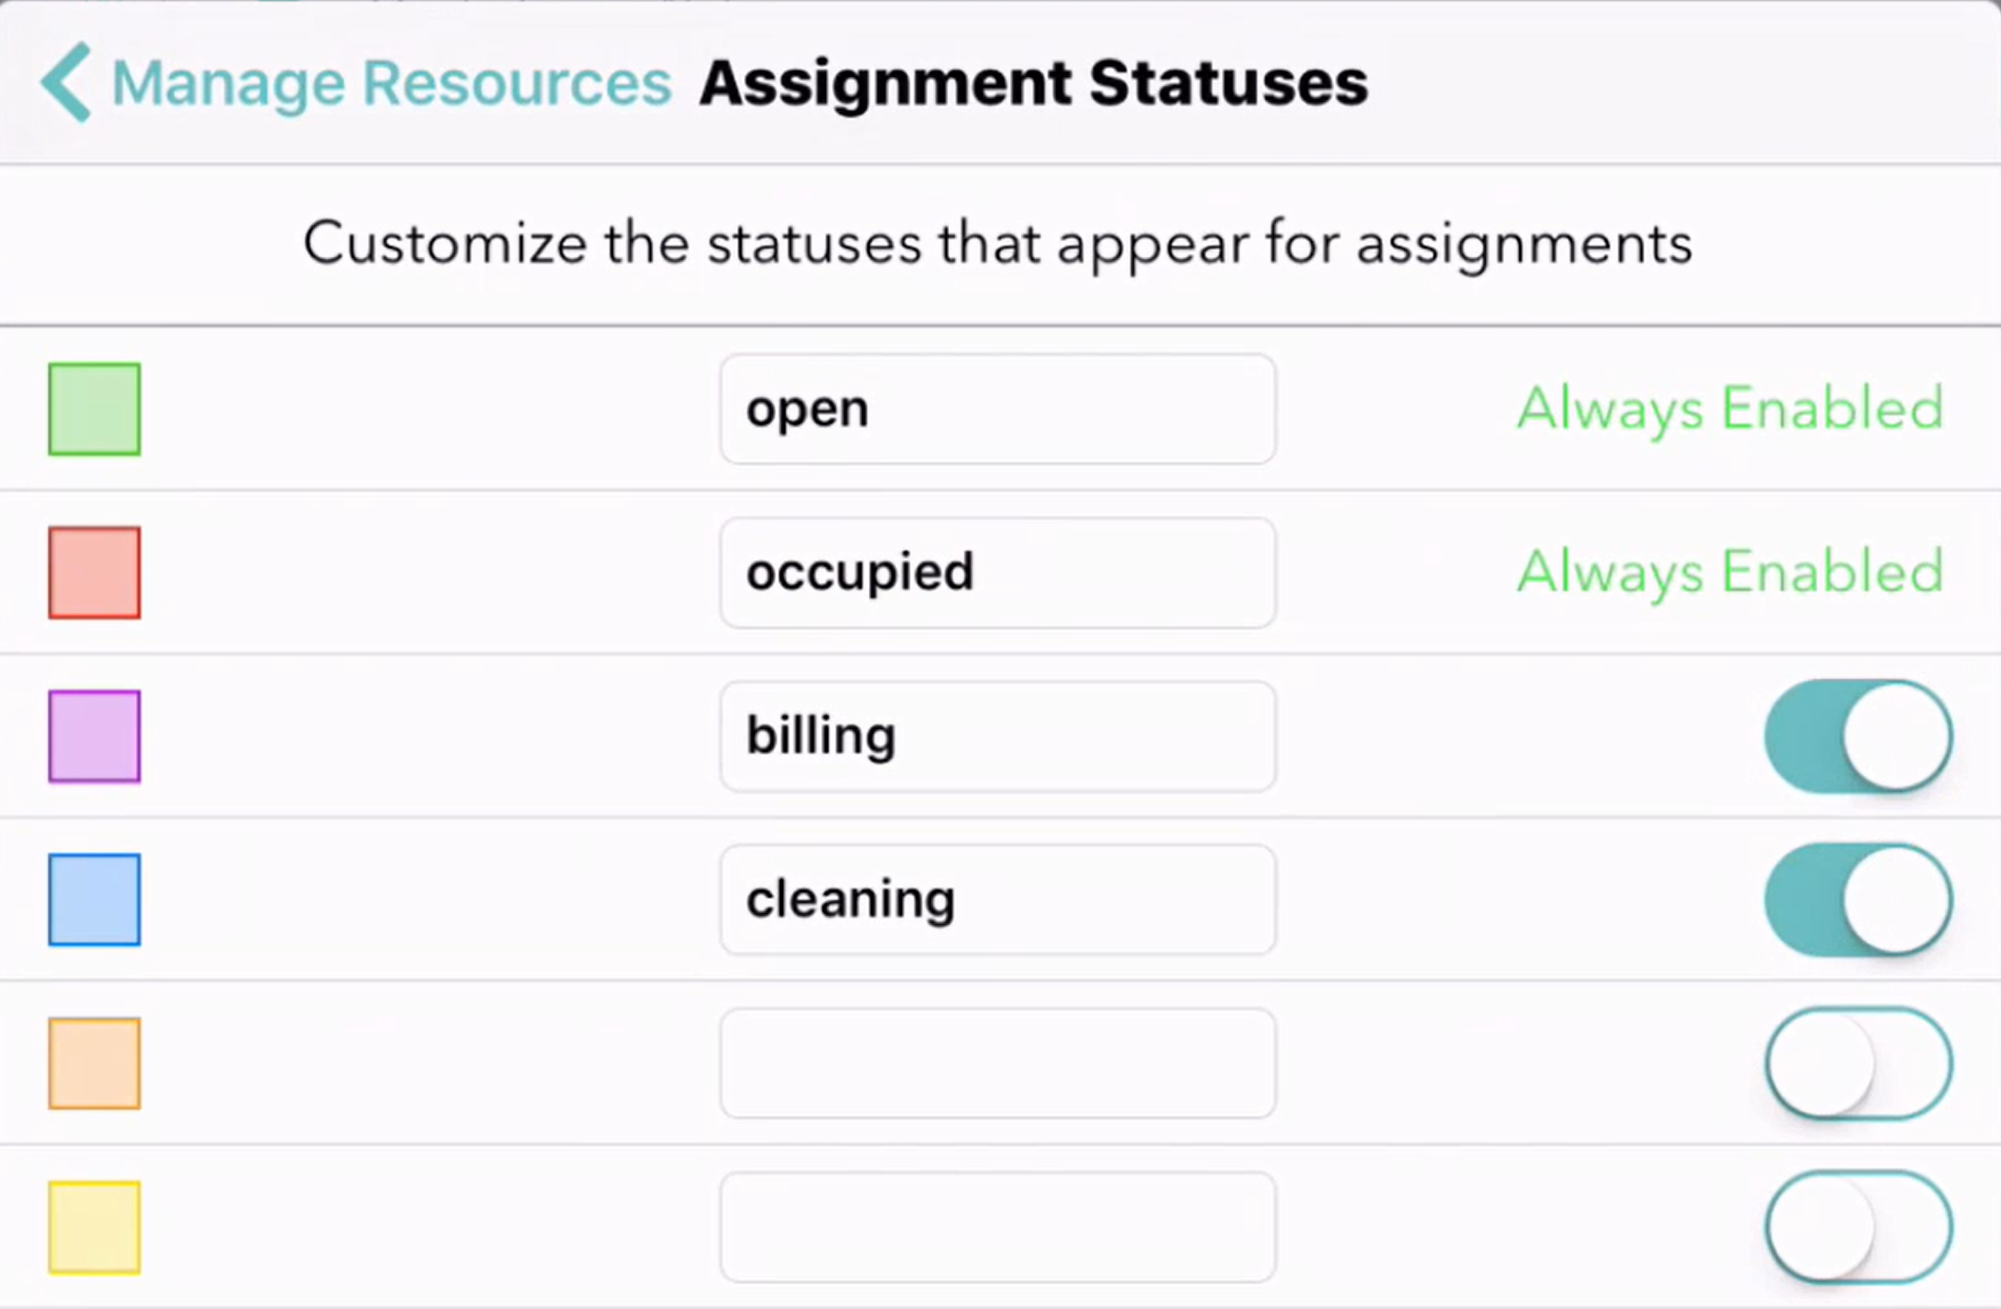
To customize your statuses, go to your Settings and then press on “Manage Resources” and then again on the “Statuses” in the upper right. In addition to the default “available” (green) and “occupied” (red) statuses, you can add four of your own statuses. Just add the names and move the sliders on the right to turn them on or off. Statuses will show alphabetically in the options when you select them, so you can set the naming accordingly. The green and red statuses for available and occupied resources are always required, and custom statuses are treated as states of an occupied resource.