Wednesday, October 18th, 2017 .

The public waitlist page is a unique URL for a web page that is assigned to your account, and has a number of features and benefits. Whenever a customer is added to the waitlist in the Waitlist Me application, they get a text message confirming that they have been added to the list. There is also a link to the public waitlist so the customer can check their place in line from their phone. They will see a status message at the top of the page and their initials will be highlighted in the list.

The public waitlist makes it easy for people to estimate their remaining wait without having to ask, and saves you time. It also helps them track when their turn is getting closer so they can be nearby when you are ready for them.  If a customer decides they aren’t coming, they can press on the Cancel link to let you know and a message will appear in Waitlist Me so you know to remove them from the list.

We have added some additional features to Waitlist Me Pro for personalizing the public page even more to your brand by editing the status messages and changing the colors of the page.

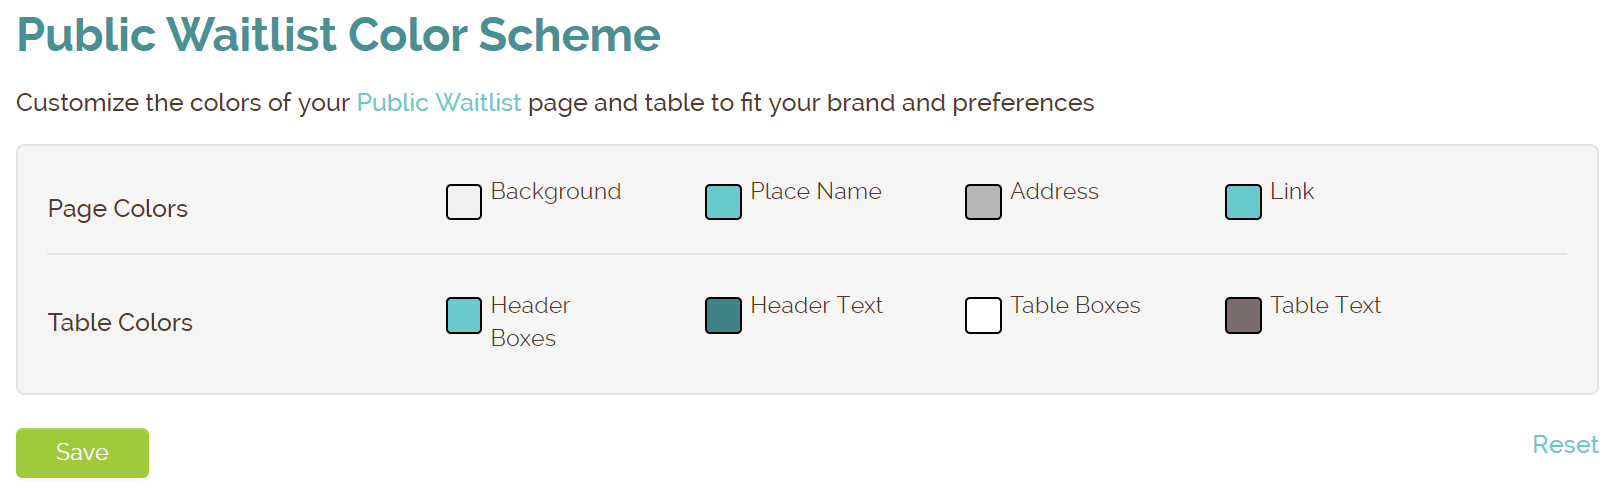
Color Scheme – Personalize the page look and feel by changing the page and table colors.  With control of the color of every element on the public page, it is easy to create a look and feel that fits your brand.


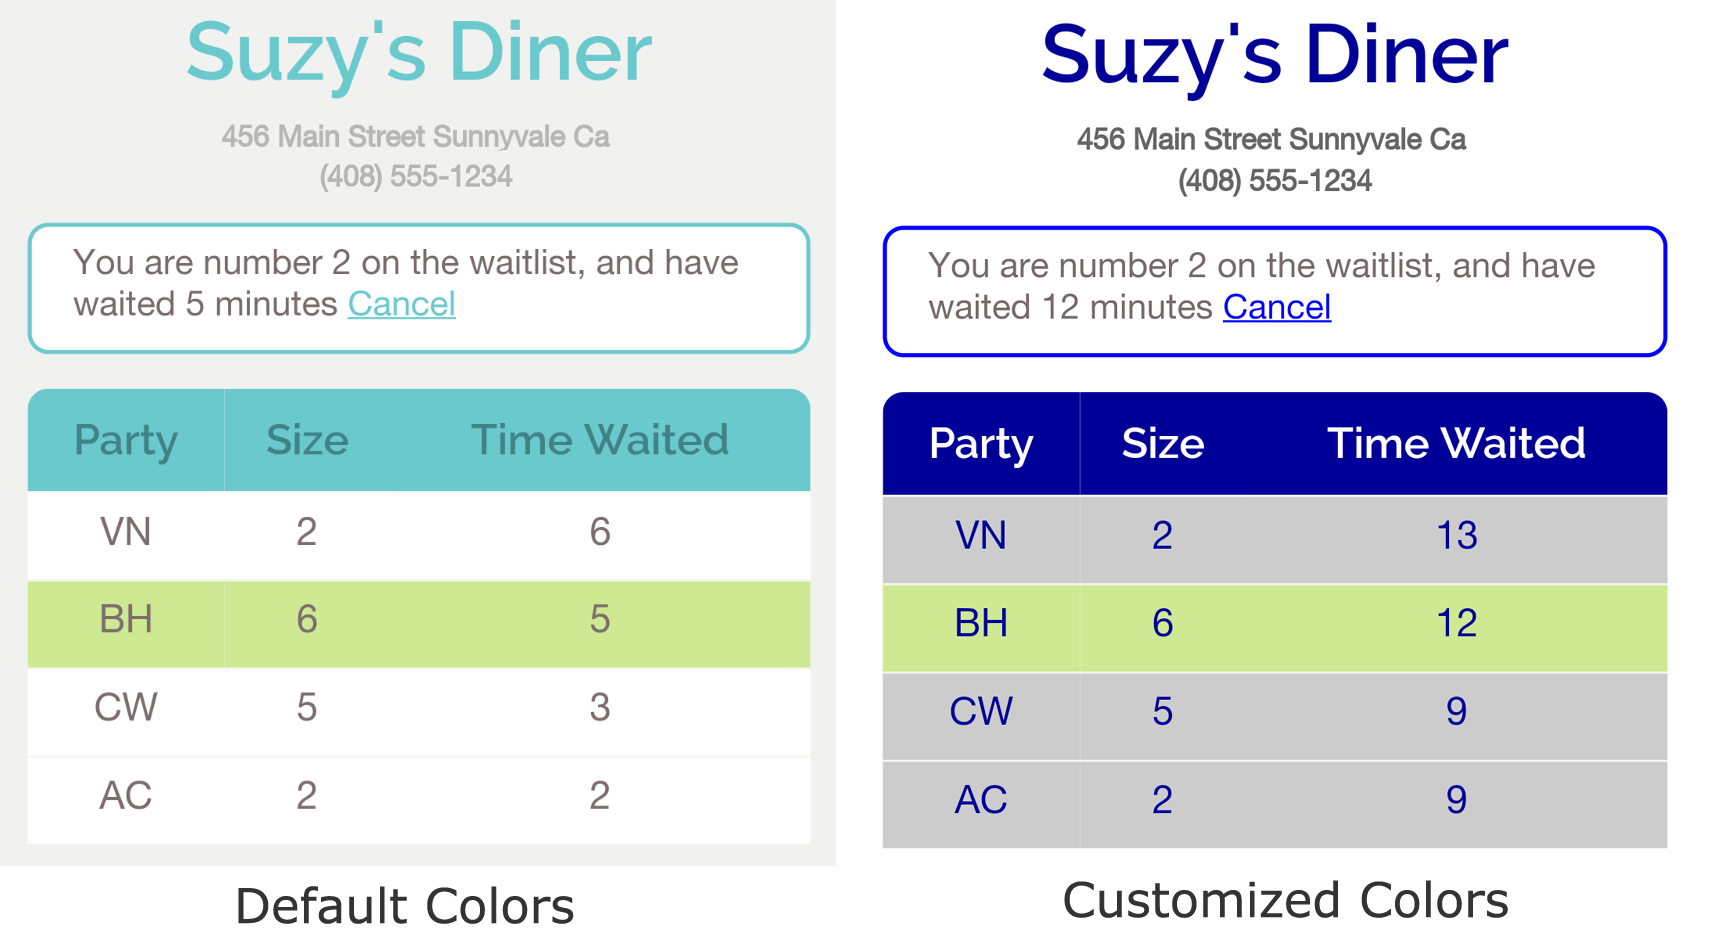
Here is an example of the public waitlist in default colors and with customized colors


Status Messages – The messages that display at the top of the page make it easy for customers to check their place in line, know when it is their turn, and cancel if they decide to go elsewhere.


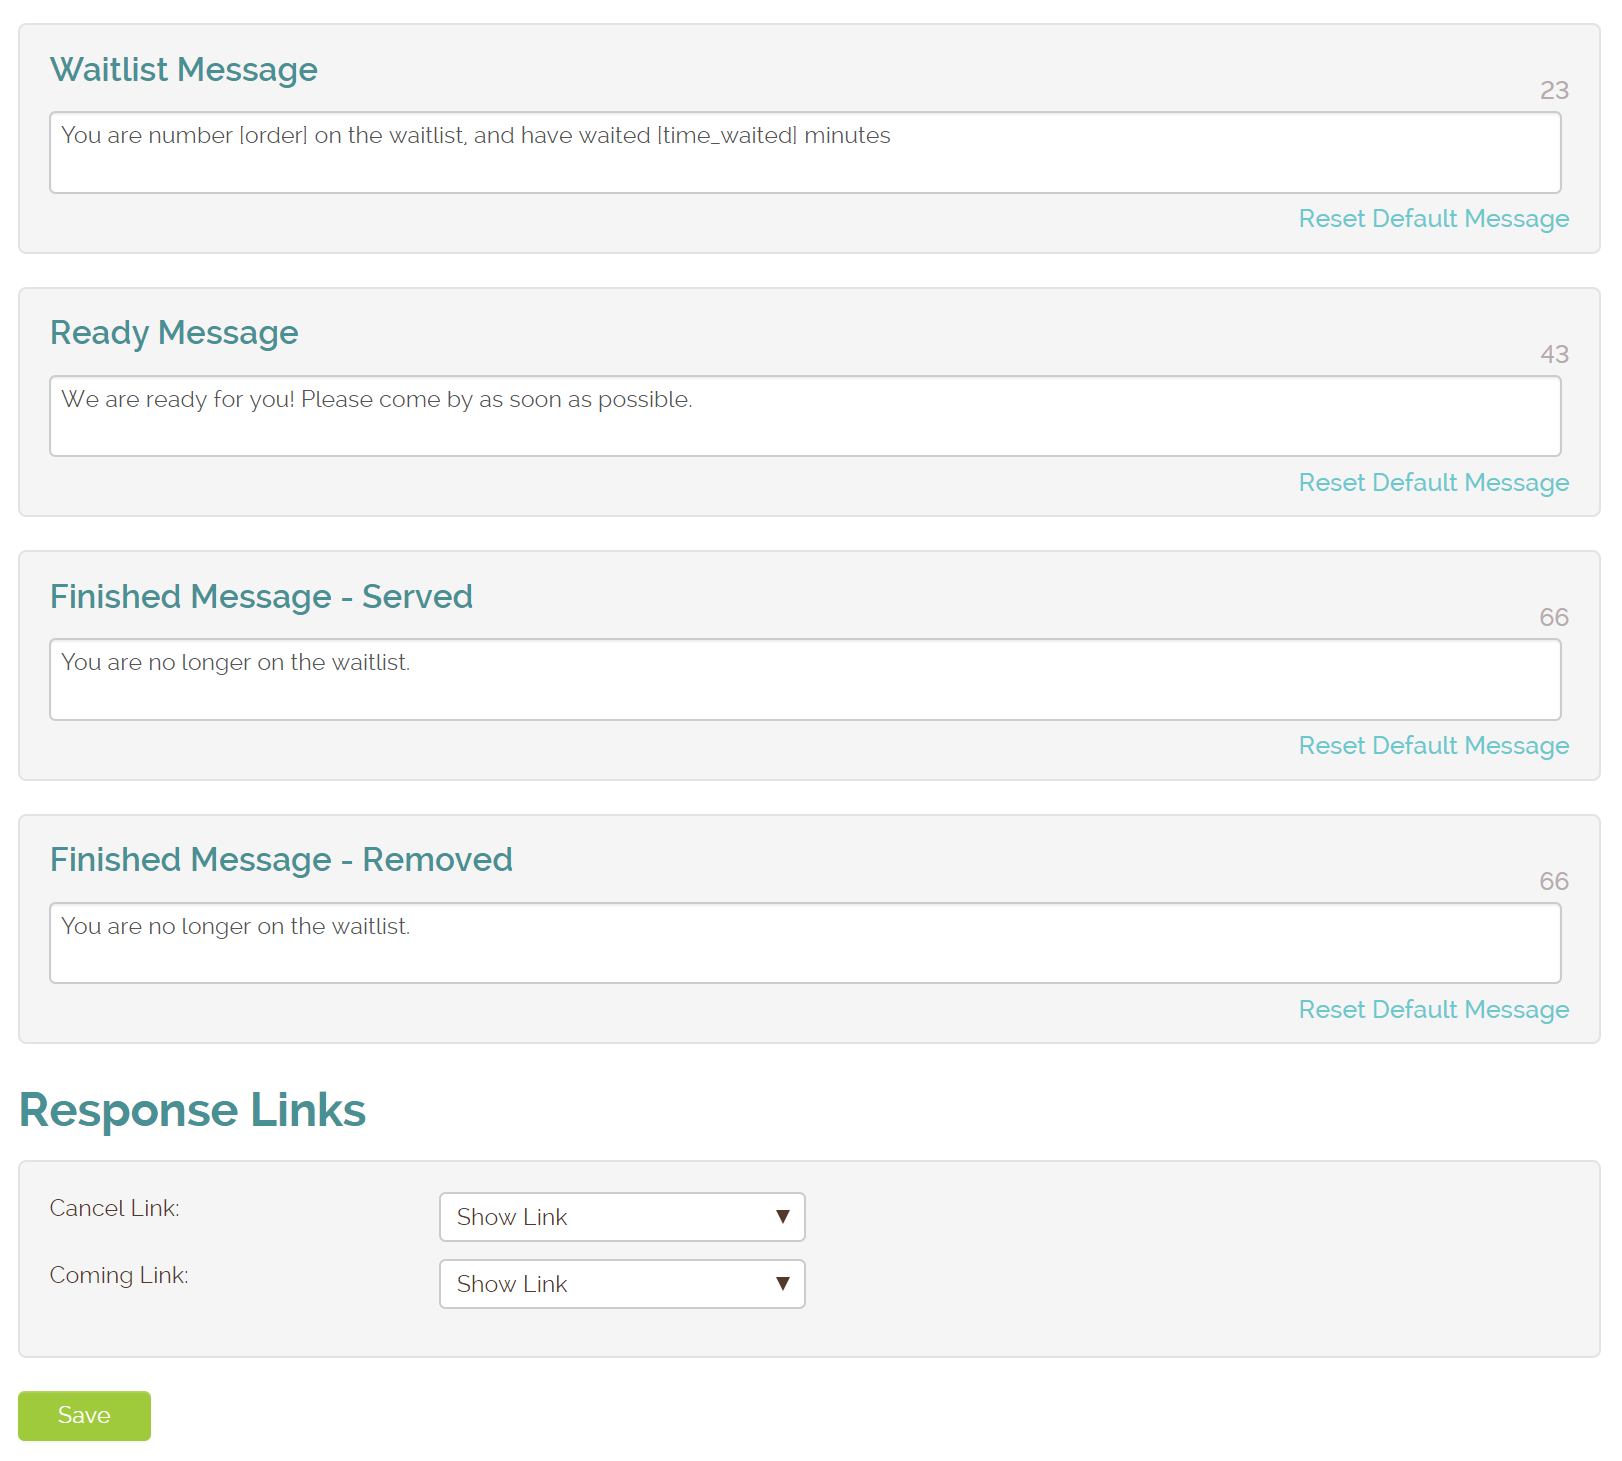
Waitlist Message – This shows when a customer is in a waiting state and the default message is “You are number [order] on the waitlist, and have waited [time_waited] minutes” (where [order] is their place in line and [time_waited] shows the minutes waited)

Ready Message – Once you notify a customer, their public page changes to “We are ready for you! Please come by as soon as possible” and gives them options to indicate they are coming or cancelling.

Finish Message – Served – After you have checked a person off the list the message changes to “You are no longer on the waitlist” and the list of customers waiting disappears.  You could customize this message to add something about enjoying their meal or suggest leaving a positive review on Yelp.

Finish Message – Removed – If you remove a customer from the list, meaning they didn’t end up joining you, the default message is also “You are no longer on the waitlist” but you could change it to something related to being sorry they weren’t able to join.

Response Links – If you don’t want people to be able to cancel or indicate they are on their way through the public waitlist, you can remove these links

Tuesday, August 15th, 2017 .

Waitlist Me makes it easy to let customers add themselves to your waitlist or reservations with our web widget, and we recently added features to our Pro service to control business hours this feature is available or accepts reservations.  Complementing these settings for regular business hours, there is now a feature to set specific blackout dates for holidays or days you might be closed or not taking reservations.

Simply login to the Waitlist Me website and navigate to Account > Settings > Customize Settings (under Add Yourself) > Blackout Dates. Press the green Add button, and choose the date you desire to restrict. The drop down menu lets you select whether you are closed and not taking reservation or waitlist requests or if you just aren’t taking one of these options like you normally would.  For example, on Christmas you might be closed, but on Valentine’s day you might be open but so busy you don’t take reservations that day.


Once a blackout date is set, you can see and manage the upcoming blackout dates on this page. If you need to remove a restriction, just hover over the date and press the red X that appears on the right.  Or click on the row to edit it.


Once you have blocked off a date, if a client tries to make a reservation they will receive a message letting them know that no reservations will be accepted:

Wednesday, June 6th, 2018 .

At Waitlist Me, we focus on helping businesses transition away from pen and paper or overly complex services. Making waiting less painful is a win for both the guests and the staff. Of course, waitlist management is only one way to streamline operations and work smarter, not harder. In this article from Dumpsters.com, check out a few more resources that show how to use technology to improve the guest experience.

Tuesday, February 2nd, 2016 .

Building on the set of resource management features we rolled out a couple months ago, we have added more flexibility for creating and tracking custom resource statuses. These statuses can be used to visually highlight different stages of your occupied resources in different colors to help make assignment decisions faster and easier.

Here is a new video on resource management, including the new custom statuses:


For example, say you are managing restaurant tables and using Waitlist Me to view what tables are available or occupied. You can sort tables by the times they have been occupied for a better sense of which ones will become available first. Now with custom statuses you could improve on those estimates even more by changing the states of tables that are waiting for their bill or being cleaned. Marking tables with customers waiting for their checks as “billing” can give your bus boys a heads up on which tables would need cleaning soon. Similarly, you can change the status of tables to “cleaning” when they are being cleared and prepped. Using more detailed statuses can help your staff at the front of the house know what tables will be available soon, which means they can quote better wait time estimates and seat customers faster. This means more revenue for the restaurant through more table turns and improved customer satisfaction.

This is just one example of how it might work in a restaurant, but the flexibility of the naming and usage of statuses means they can be tailored to different processes in different businesses.

To change a status in Waitlist Me, all you have to do is press on the resource and an action bar will appear at the bottom of the screen. This area shows information on customers currently occupying and waiting for the resource, and has actions for moving and clearing customers. Pressing on the status on the left will bring up a list of statuses, and selecting one will change the status and color of the resource. In the list view, just tap on the status color to change it.

status - full view


Note that when you choose a custom status you can see both the total time a resource has been occupied as well as the time spent in the current status, which is shown in parenthesis. This makes it easy to see total visit times and times in specific statuses at a glance, so you can tell if a certain stage is causing more delays than others and how that might be affecting total wait times.

Accompanying the custom statuses are a couple of new sorting options in the Grid view, where you can view your resources grouped by Status. Select “Status the ABC” to have all the statuses grouped together and then ordered alphabetically by the resource name or “Status then Time” to have them ordered by the length of time they have been in that particular status.

To customize your statuses, go to your Settings and then press on “Manage Resources” and then again on the “Statuses” in the upper right. In addition to the default “available” (green) and “occupied” (red) statuses, you can add four of your own statuses. Just add the names and move the sliders on the right to turn them on or off. Statuses will show alphabetically in the options when you select them, so you can set the naming accordingly. The green and red statuses for available and occupied resources are always required, and custom statuses are treated as states of an occupied resource.

status - settings


Tuesday, July 23rd, 2019 .

One of the features included in the Pro subscription is a Stats page that gives an overview of the shift or day. Quickly see data for each server: how many groups they’ve had, how many total people were in those groups, their average party size, and the average time it took to turn tables. 

You can choose what time frame you would like to see stats for. Pressing on Time in the header bar will let you select from these options:

– Current day – see all of today’s numbers

– Past hours – choose any increment up to 24 hours (for example, view the past 4 hours on a rolling basis)

– Shifts – enter in blocks of hours to coincide with your shifts (for example, 11:00 am to 4:00 pm and 4:00 pm to 11 pm) 

Press on the Stats icon to go to the new analytics view. This page will display each section name, the server assigned, how many groups/people have been served, and averages for party size and time. Pressing on the headers at the top will sort by any of those categories. If you prefer to see things graphically, using the radio buttons at the bottom of each column will display that data in the chart below.  You can also see all these metrics by table or assignment, by clicking on the Sections label at the top.

The data on the Stats page can help hosts know where to seat the next party, so that each server gets their fair share of the work (and the tips!) 

Before getting the most out of the new stats features, you’ll need to set up your tables and sections. Then you can choose a layout, select how you want to view the tables, and assign servers. Sort by Section and use the Labeled mode in order to add server’s names to sections. Use the Edit link in the header row of the first section to enter server names.