With spring comes warmer weather and sandal-shoppers, and more customers in your salon. Don’t leave them stuck sitting on a bench, frustrated with the wait times. With Waitlist Me, you can give your clients the freedom to take a walk in the spring weather while tracking their wait on their phone…without losing their spot in line. They will receive a text notification when they are added to Waitlist Me, and can check to see how many people are ahead of them from their phones. Then just press a button to send a text notification to let them know when you are ready for them.
An easier waiting process will encourage customers to return and refer friends. Waitlist Me also allows you to schedule reservations, so you can keep things running smoothly with both your regular visits and larger bookings like for birthday parties, bridal showers, and outings with friends. Reservations for the current day will automatically appear in the same view as your waitlist so managing your schedule and walk-ins is a breeze.
When giving their name, customers can also specify what they would like for a service, from the person they would like to help them to the style of manicure or pedicure they would like. This makes it easier to schedule them for available or preferred nail technicians, and speeds up the entire process, so you can serve more people per day while providing a more and a more relaxing experience for your clients.
With a waitlist system that gives you more valuable information, you can measure how many people are coming into your salon every day, and how quickly those customers are being helped. This will help you improve the wait estimates you give to your clients and improve their wait experiences. Set your nail salon above the rest by streamlining your services and getting rid of paper waitlists and reservation books. No more remembering to buy another reservation book, losing pens, running out of space and deciphering illegible handwriting.
Spring is the perfect time to clean up your reservation system, so try Waitlist Me.
With the floorplan features in Waitlist Me, it’s easy to visualize your tables and manage your sections and staff.
In Floorplan view, you’ll see all of your tables, arranged however you like. Green tables are open; red tables are occupied. You can also see how long a table has been occupied, or if it’s been reserved for a particular time. And you can tap on a table to open the action bar, where you can see details about the party, update their table’s status, clear the table when they’re done, and more.
You can also see your sections, marked with colors, dividing lines, or both. You can create custom layouts, and change these sections on the fly. Perhaps three sections is enough for a quiet lunch, but you need more for a busy evening. You can see which employee is working each section, and how many groups, and how many people, they’ve served today. You can zoom in for a closer look, and scroll across your floorplan. You can even see floorplans for other parts of your restaurant—for instance, for your patio or an upstairs meeting room. It’s all up to you.
To start building your own floorplans, just tap on the round icon to access the table management section.
Notice: Here in Grid view, you can see that I’ve already set up some basic tables. Each one has a name (in this case, the table number), and a size: the number of people it can seat. And I’ve divided those tables into sections. If you need any help with tables and sections, please see our video on “Managing Tables.”
Now, tap the button on the right, and switch to Floorplan view.
The first time you visit this page, you’ll be prompted to add a room—for instance, your main dining room. Just give your room a name, choose a portrait or landscape orientation for your floorplan, and then tap “Add.” You can add additional rooms if you like. Then, tap “Back,” to save. You can tap on the name of your room at any time, to see a different room, or to add additional rooms.
Now, tap “Edit,” to start building your floorplan. If you have not yet created your tables, just tap on the gear icon to access the table management settings, where you can manage your tables, sections, layouts, and more. Or, if you’re ready to proceed, just make sure you’ve selected the room you want to design. And then, tap “Add.”
You can choose an existing table from the list—or, add a new table at the top. (Simply give your new table a name, specify how many people it can seat, and tap Save.)
You’ll be prompted to choose the physical size, and the shape, for this table.
Now, just tap where you want your table to go. The table appears on your floorplan, along with a set of tools. You can tap and drag, to adjust your table’s position. Drag the arrows to stretch the table in a single direction. Use the double arrow to stretch your table in both directions at once. Tap the round arrows to rotate your table, by 45 degrees at a time. Tap the copy icon, and then choose an existing table or set up a new one, to make it exactly the same size and shape on your floorplan. Or, tap the dots, to edit the table’s name and size, or to delete it entirely. When you’re ready, tap anywhere else on the screen to hide these tools.
You can add as many tables as you need.
If you like, you can also use your floorplan to work with any sections and layouts you’ve defined for your restaurant. (For help setting up sections and layouts, please see our video on “Managing Tables.”)
Choose a room, and a layout. And then, tap “Add,” and choose “Element.”
You can add a dividing line—just tap to give your line a starting point, and an ending point. You can drag either of these points to adjust the angle of your line, or move the whole line to a new position. And again, tap anywhere else when you’re done.
Or, you can tap “Add,” choose “Element,” and then pick “Label.” Just choose which section this label is for. And tap on the screen to choose its position.
When your floorplan is complete, tap “Exit.” Then, tap “Yes” to save your changes.
Once you leave Edit mode, your section labels are automatically updated to show helpful details—by default, the name of the server in each section, and how many groups and individual customers they’ve served today.
Of course, you can come back to Edit Mode at any time, and update your floorplan. Or, you can modify your floorplan for another layout—for instance, to set up this same room for a different shift. Your tables remain where they are, but your lines and labels disappear, so you can set up a different set of sections for that shift. Then, you’ll be able to change your sections on the fly, as you move through your day.
Remember, you can tap the gear icon to access the settings pages for your tables, sections, and layouts.
For more options, tap “Display,” and then choose “Floorplan.” For instance, you can change the size of the text in your section labels, and decide what information those labels should include. By default, the label shows any notes for the section (for instance, the name of the server), and the total number of parties, and individual customers, who’ve been seated in that section today. But if you like, you can show the current number of open tables (and/or occupied tables) in each section, instead.
In the same way, you can decide what information should appear directly on your tables. By default, you’ll see how long each table has been occupied. But you can hide this information—or show the name of the section, instead. And if you’ve assigned colors to your tables, you can use these colors to highlight the table name (in this case, the table number), or highlight the name of the section, or not.
You can also come back to Grid view, tap “Time” at the top, and decide how to calculate the totals that will appear in the section labels on your floorplan. Would you like to see how many parties, and how many individual customers, you’ve served in each section all day, or just during the current shift? Or, would you like to see your totals for the past so many hours—from the past 1 hour, to the past 24?
Now, you’re ready to start using your floorplans. At the beginning of each shift, simply choose the appropriate layout, to instantly update your sections. Then, tap on any section label, for a list of all of your sections, and your notes on each one—in this case, the name of the server assigned there. Tap “Clear All,” fill in the servers for the new shift, and then save your changes, and you’re ready to get to work.
And remember, you can tap “Open” at the bottom, to enter split-screen mode, where you can see your floorplan, and your waitlist, at once. You can drag the handle to show more or less of the waitlist—or tap “Close” to hide it entirely and only see your floorplan.
In addition to robust waitlist features, Waitlist Me offers scheduling features for reservations and appointments. View and manage your schedule anywhere from the Apple or Android app, or by logging into the website.
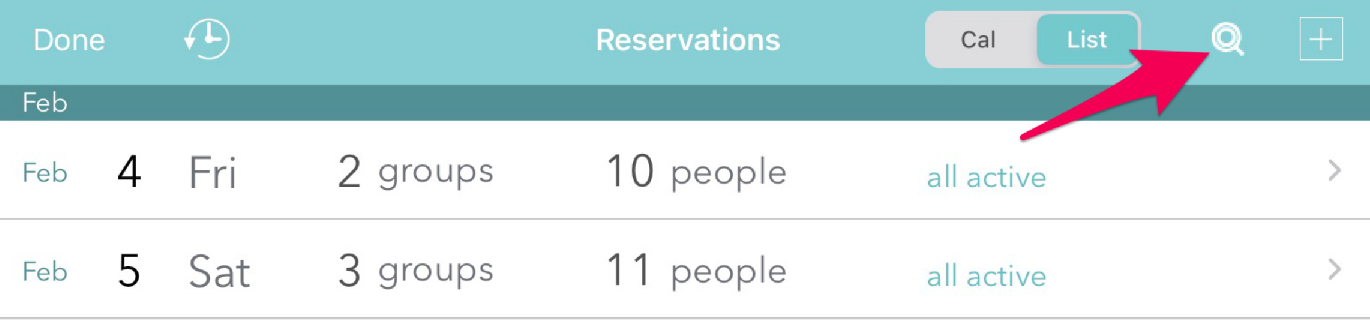
Making changes to future reservations is even easier with our new search feature. Now if a customer contacts you to change their reservation, you can simply search by their name, phone number or email address. This option is available on all platforms by using the search icon on the main reservations page. From the search results, press on the customer’s row to open the desired booking and make any changes needed.
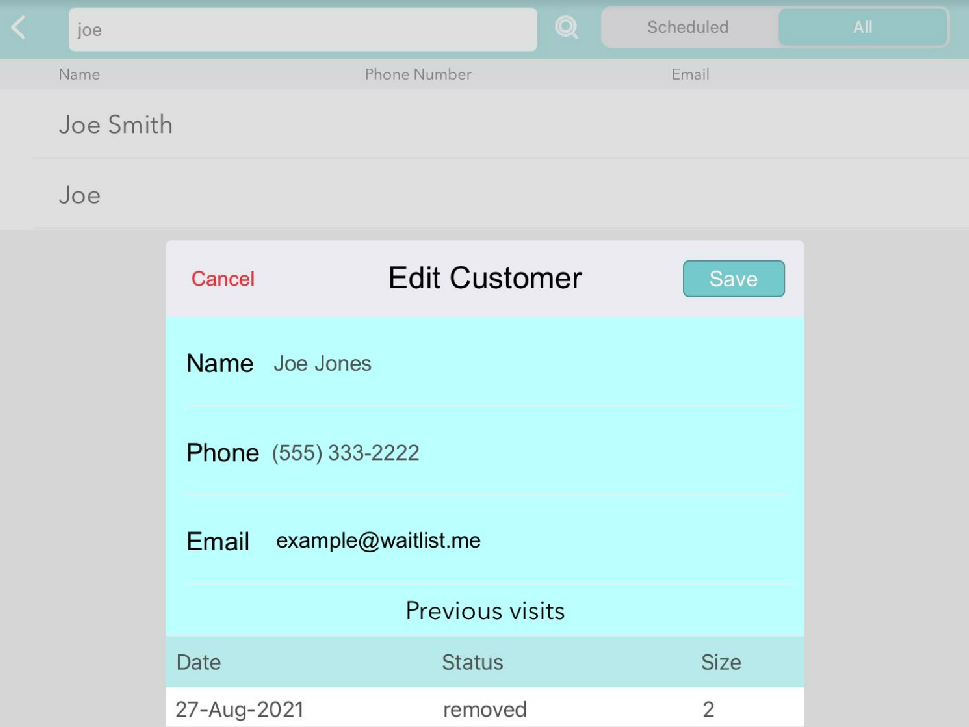
A toggle switch at the top of the page will also allow you to simply search for a specific customer, whether or not they have an upcoming reservation. You can use this to see past visits and upcoming reservations as well as to edit the customer’s information. For example, if the customer’s name was spelled incorrectly or if they changed their phone number, you could update those details. When you use the auto-remember names feature, that customer’s information (name/email/phone number) will populate as you are creating bookings. That feature can be found in the app settings under Customization > Adding Customers.
To view other recent reservation enhancements, check out this page on new sorting options available and this page on email confirmations.
One key benefit of using a system like Waitlist Me is the increased customer satisfaction that comes with providing more accurate wait time quotes. It can be challenging for staff to estimate the wait times correctly, and it can be frustrating for customers when they are told wait times that don’t turn out to be correct. There are several ways Waitlist Me helps you make smarter wait estimates, and we have recently added new features to the browser version of the service that can be accessed by logging into our website.
Experience has shown that being able to see the actual waits next to the wait estimates helps people improve their wait estimates over time, as it provides a key feedback loop for knowing how accurate estimates are and when they need to be adjusted based on changes in traffic patterns.
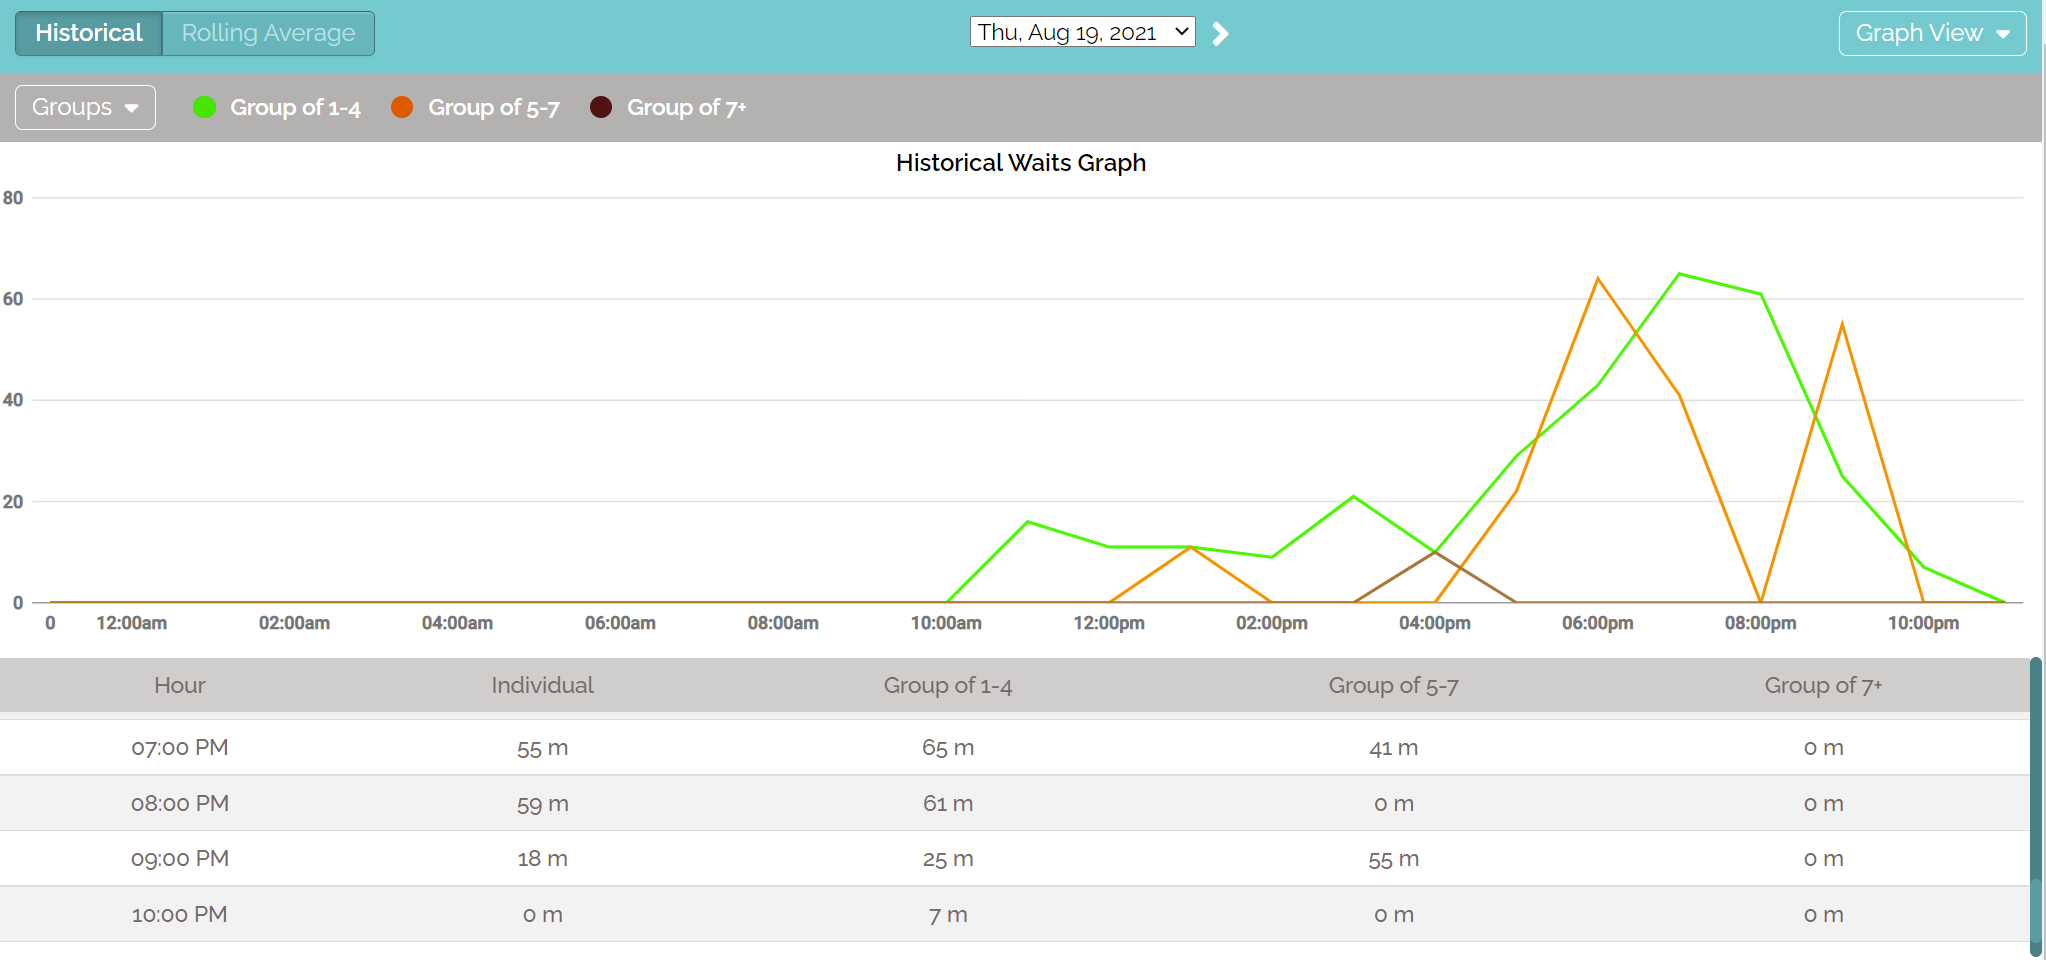
In addition, Waitlist Me has a couple ways for suggesting wait times based on rolling averages and historical wait times. The rolling average method recalculates estimates every time a party is marked as served and includes settings for how long of a time period to use and how to treat parties of different sizes. The historical wait method provides suggestions based on daily patterns by using past data for each hour and day of the week.
In addition to seeing real-time smart suggestions as customers are served, there are graphs that show this data over time and by party size. These graphs have been available in the tablet versions of the Waitlist Me apps and are now available in the browser version. Check out this article for more details on the smart wait estimates and graphs.
We are happy to announce the opening of a new headquarters in Charleston, South Carolina. Waitlist Me started in the Silicon Valley by former Google employees as NoshList, a popular restaurant app, and expanded to serve businesses across multiple industries. As part of the company’s aggressive growth plans, Waitlist Me considered a wide range of options and was attracted to Charleston for a number of reasons.
“Charleston is a true hidden gem for tech start ups,” said Brian Hutchins, Waitlist Me CEO, “When you consider the beauty of the area and all the things the city has to offer, it is hard to beat the quality of life, and that is a key strategic advantage in attracting and retaining top talent. Furthermore, smart investments made in infrastructure and programs to support business innovation are starting to pay dividends in Charleston, and the local tech economy is evolving rapidly. Waitlist Me has an office at the Charleston Digital Corridor, is part of the Harbor’s Propel accelerator program, and will be exhibiting at the DigSouth. These are a few examples of very valuable initiatives that have come into their own relatively recently.”
To celebrate the occasion, the company will be giving away a free year of its Premium service to ten Charleston businesses that need it most, based on suggestions from locals. The offer is designed to raise awareness around how technology can improve wait experiences in Charleston. It also opens up ways for the broader community to engage and share ideas. Many businesses are still struggling by using paper or clunky buzzer systems, and don’t realize there are better ways to manage their waits. People that visit these places feel the pain though. Nominating a business for the prizes is as simple as visiting www.waitlist.me/charleston and sharing a business name and experience that could be improved.
Charleston is well known for its hospitality, and Waitlist Me is tool local businesses can use to help offer the exceptional level service that makes it a top tourist destination as well as a great place to live. Instead of just standing around bored or frustrated, waiting customers could take a nice stroll, experience more of the city, shop, and more. It’s a win-win for everyone, and we are hoping people will help us spread the word.