Tuesday, October 27th, 2020 .

Waitlist Me’s Pro & Platinum subscriptions offer more opportunities to tailor the customer experience to fit your brand image and messaging by allowing custom HTML to be added to key touchpoints. You can customize several of the views customers see when scheduling a reservation or joining the waitlist as well as the views of the public waitlist they can see while waiting and after they have been served.  

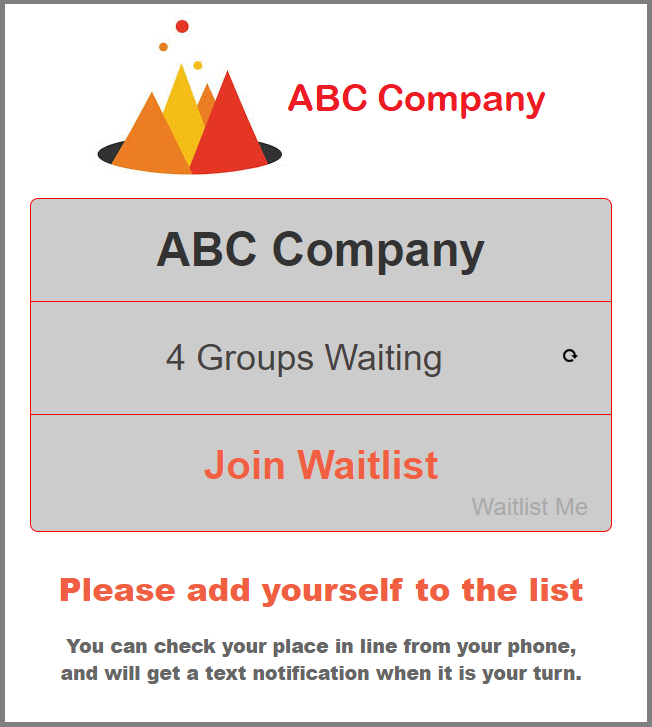
Add Yourself – When using the Add Yourself features on the main web widget and kiosk views, you can include a block of HTML to the page to display rich-formatted text and images. On the main view before customers enter the information you might provide information about rules for scheduling, requirements for entering your business, or anything else that might be helpful to customers when joining your waitlist or making a reservation. You can also add different HTML to the confirmation page that customers view after they add their info and submit their request. Helpful information here might include a link to a restaurant’s menu or a store’s catalog, so people can browse and make selections while they wait. 

You can add plain text, HTML, links, and/or pictures. Make changes by logging in to www.waitlist.me and  going to Account > Settings > Add Yourself. In the Main View section, there’s a link for Edit HTML; use this for the main widget view. Further down on the Add Yourself settings page there’s an option for Confirmation & Approval. There you’ll see another link for Edit HTML; use this for the confirmation page.

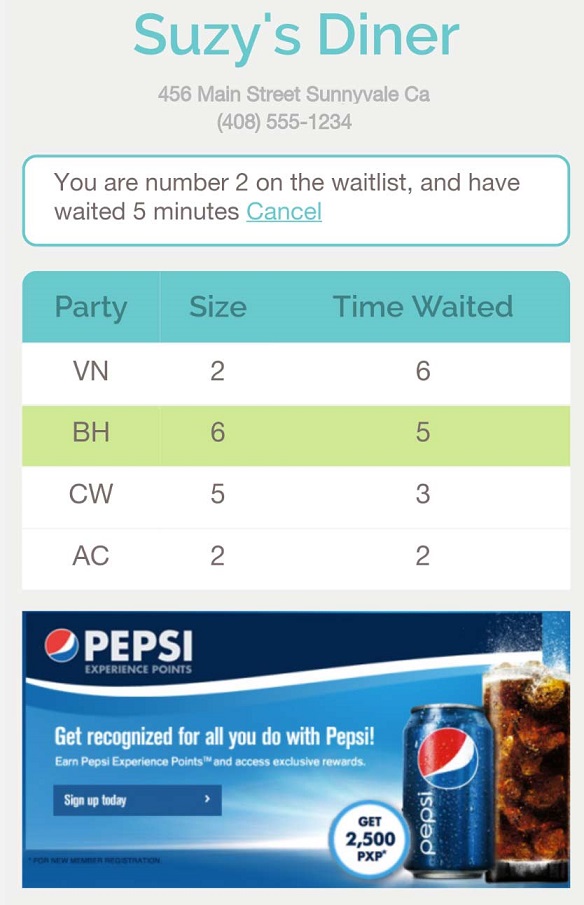
Public Waitlist Page – When you add customers to the waitlist or they add themselves remotely, there is an option to send them a confirmation text with a link to the Public Waitlist page. Custom HTML can be added to the bottom of this page for customers to view while they wait. Details about sales, links to menus/catalogs, or instructions for signing up for a rewards program could all be a great way to help customers pass the time while they are waiting. 

Public Waitlist Custom HTML Statuses – Once you’ve notified a customer that you’re ready for them, the table view of the public waitlist will no longer be visible and a graphic showing a ‘Ready!’ sign will appear. After customers are checked off the list, they’ll see a ‘Thank You’ picture. Change one or both of these to your own pictures by going to Account > Settings > Public Waitlist > Colors & Custom HTML > HTML Statuses. You can also customize the status text that appears in the boxes at the top of these views. See more details here.

Tip! Custom HTML allows you to include images that are hosted on your website or another location. If you need a service to host your images, we suggest checking out Cloudinary or Imgbb

Full-page Custom HTML Display – For the ultimate options in customization, the Platinum subscription offers the ability to fully re-create the web widget and kiosk views using HTML, CSS and JavaScript. You’ll need a web developer to use these features. You can change all the visual elements of the view while still taking advantage of the structured data elements and key features like the wait estimates. And of course, you can add your personalized branding throughout each screen customers see in the process of joining the waitlist and scheduling reservations. This page has more information on these options. 

Monday, October 5th, 2020 .

You’re a small business owner. You shouldn’t have to be a tech whiz. Forget all the training hassles. Forget the painful user manuals. There’s no reason for you to waste your time and money on waitlist management software that’s anything less than plug and play.

Here are seven easy ways to figure out if the tool you’re eyeing is more trouble than it’s worth.

You can’t buy it without talking to a sales person.

If a product is straightforward and user-friendly, it sells itself. You should be able to watch a quick video, then just jump in and start using the product. When a demo from a slick sales rep is required, it’s not the simple solution you’re looking for. Remember: You want to buy the product, not the pitch.

The pricing comes with more fine print than a cell phone contract.

Start-up fees, 24/7 support fees, usage surcharges, complicated pricing tiers, contracts that lock you in for a certain amount of time—these are sales tactics companies use to hook you with a low upfront price and milk you down the line.  Your bill should be simple to understand.  It should be predictable and not change from month to month.  And most importantly, there shouldn’t be any surprises.

Or, even worse, there is no pricing.

One reason a tech company would make you inquire to discover the price of its software is that it knows a salesperson is more likely to get your credit card number than the product itself.  Another reason is to figure out how much money you can afford or are willing to pay so they can extract more money from you.  Throwing out a high list price (that isn’t actually listed anywhere public for fear of scaring people away), and playing the discount game to make you feel like you are getting a bargain is a common sales tactic with complicated software.

There’s a training program, and you probably have to pay for it.

You don’t train someone to use a simple product, you just use it.  Look at great technology companies like Google, Amazon, and Uber as a few of many examples where simpler solutions are less expensive…  The more complex and detailed software is, the more time you need to spend learning it, training your employees on it, and retraining your employees on it when there’s an update. Plus, there’s an increased likelihood of mistakes and complaints. You should get help when you need it, not need to get help just to be able to use a service because it is complicated.

Installation requires you to do 37 other things

A good solution doesn’t require multiple trips to electronic stores. A simple solution doesn’t keep telling you to download more programs to make it work correctly. A good, simple solution is the one that fixes your problem now, without a tacked-on to-do list.

Your customers need to download it, too, in order for you to use it.

Software shouldn’t just be easy foryou to use; it should also be a no-brainer for your clientele. When you add another barrier to use, whether it’s downloading an app or creating a unique login, you’re making customer service harder on yourself.  Everyone has a phone that receives text messages and calls.  They shouldn’t need to install an app.  And most won’t go through the extra effort so you are limiting the number of people than can receive better service with a simpler solution.

Figuring out which button does what feels like decoding your car’s dashboard icons.

When business is busy, you can’t afford to waste time fumbling with your software’s interface to access a certain feature. The line stretches out the door, the customers’ toes start to tap, and the person you’re trying to serve thinks you look like a doofus. And that is not how you want your next Yelp review to read. You should be able to know what every single button does instantly, not after countless seconds of deliberation.  And you shouldn’t have to navigate through all sorts of options and secondary information when greeting a customer.  Eyes on the customer, not the iPad.

Listen: We get it ‘cause we’ve been there.

That’s why we took simple and traditional tools —paper waitlists, reservation books, and grease-board floor plans—and transformed them into one intuitive app that you can download now and use now. Find it in the App Store and Google Play Store, or sign up at www.waitlist.me.

Wednesday, July 22nd, 2020 .

When a customer who is on the waitlist or has a reservation sends you a text, you are able to see their text reply.  This helps you know when a customer decided not to come so you can remove them from the list, if they are on their way so you can hold their table, or if they have something else to ask or tell you.  With a Pro subscription, you can send open text replies to customer texts for more flexible communications.

Another Pro feature we have recently added is the option to enable an audio alert or visual highlighting when customers send you text messages.  Normally you would see a note in the customer row when they send you a text, and the full details of texts sent and received when tapping on the customer row.  The new alert features make it easier to know when a customer replies and which customer replied by playing a sound and flashing the area of the notes to attract your attention to the right spot to look.

Here’s how to set these up. If you use Waitlist Me in a computer browser, make sure you’re using the new version (there’s an option at the top of the waitlist to switch to the new version). Then on the top right of the main waitlist page click on the Settings gear icon  and go to Custom Behaviors > Receiving Texts. Here you can turn on options to play a sound and/or highlight the section of the waitlist that has the text response alert for a customer. These settings will apply to any devices using the web version.

In the Waitlist Me apps, the Custom Behavior settings are device-dependent, so you can choose whether to have them on or off for each different tablet or phone you’re using. In the app, go to the gear icon > Customization > Custom Behaviors > Receiving Texts to edit these options. Once turned on, you would hear a chime and see the highlighted area when you have the app open on your device.

Friday, July 17th, 2020 .

Our table management and resource management tools help businesses track availability and the time customers spend at their business.  When assigning customers to a table or resource or moving customers between resources we have had a pop up for choosing from a list of assignments in some of our views.  In some cases this is a quick and effective method, but other times it may be easier to select a table from the floorplan view or a resource from the grid view, so we have added a new tap to add option that switches to these views for selection.  We have also optimized the action bar in the process to make it easier to view information on customers waiting for or occupying a resource and perform key actions like clearing, serving, and moving.

When you select an open table the action bar at the bottom will show the name & size, and the Add button will allow you to choose a party from the waitlist to assign to this resource. 

After a party is assigned to a table, tapping on that table will allow you to mark that customer as served (checking them off the waitlist), and show the table as occupied. 

Once a party is seated, tapping on their table will bring up an action bar to display the party’s name, size, and how long they have been there. Pressing the Current button will give options to move the party to another table, or clear that resource to mark it as available. You can also clear a party from a table by pressing their current ‘Taken’ status on the left of the action bar and selecting ‘Open.’

On the waitlist screen there are new options for assigning a party to a table. If you press in the Assign column for a party, you’ll see a list of tables that you can assign the party to. There will also be a new button at the top right of this menu, for Grid or Floor (depending on what view you’re using). Pressing that button would take you to the grid or floor view, where you could then tap on a table to assign the party. 

Once you choose Grid or Floor, the app will remember your selection and default you to that for future selections. The Floor/Grid button on the upper right will switch between those two views. If you prefer the list of tables, just choose Use Pop-up on the upper left. For the floorplan view, if you have more than one room you will also see your menu on the upper right to switch between rooms. 

When assigning a party to multiple tables, just press and hold the first one and then you will be able to select more. Press Done on the upper right to finish assigning multiple tables.

Tuesday, July 7th, 2020 .

From the perspective of a restaurant customer:

If you had told me in January that 2020 was going to the year of a pandemic, that wearing a mask to the supermarket would be necessary, and we’d all be forced into quarantine for weeks on end, I would have laughed out loud. This year has been nothing but strange, I think we all agree on that, and as we begin to transition into “normalcy,” we are all curious as to what the new normal will look like. And as nerve wracking as it may be, I personally can say I am excited. I’m excited to see friends and family, I’m excited to go to the beach, and I’m most excited to get back to restaurants. 

I’ve always had an immense passion and love for food, and as much as I love to cook, I am very over it. As cities and states begin to roll out their reopening plans, restaurants are opening their doors to customers for both patio and indoor dining options. But even as restrictions lift, there are still rules and regulations in place to keep both guests and staff safe, which I appreciate deeply. Although I am excited to sit with friends and enjoy a meal at my favorite places, I also want to ensure that we are being safe and remaining healthy.

My favorite restaurant might not look identical to pre Coronavirus times, nor are the rules in place going to be the same. But, as a guest, it’s important to respect and embrace these differences. My server will more than likely be wearing a mask, I may not be able to sit at a table with 10+ of my closest friends, and I may be asked to wait in my car, rather than at the bar, for my table. All of these changes are ok! I will survive! The restaurants are doing the best they can during a seriously challenging time and it’s important as guests to show up, show support, and show understanding. 

The list of differences from past to present can go on and on, but I think focusing on the future and adapting to what many are calling the “new normal” is what is most important. Restaurants are equipped with the best systems, staff, and regulations and we now have to be the best customers and come equipped with all they ask for. 

Top Three Things to Remember When Dining Out:

Social Distance: Remember to stay 6 ft. away from anyone outside of your party, when possible. To help both the customers and the staff during this transition, restaurants may invest in an app like Waitlist Me. Waitlist Me provides staff with easy and effective ways to manage their waitlist and reservations both in Coronavirus and non-pandemic times. Being able to send a text message to a guest when their table is ready so they don’t have to wait inside is a great feature for reducing crowds. 

Hygiene, hygiene, and more hygiene! It may be the restaurant’s job to sanitize more frequently and ensure their staff is healthy; but it is your job to always wash your hands, and to check your own health before walking in the doors.

Respect the guidelines put in place by each individual restaurant. Many restaurants are urging guests to wear masks when possible. Some are asking you to please sanitize your hands before entering. And, others have detailed layouts for guests to follow to help prevent exposure. The list goes on, so pay attention and read the signs! 

You might look at this list and scoff, but remember, the restaurant may not look the same and the rules might not be the same but the food IS still the same, and that’s really what is important. So if you’re like me and you have a deep admiration for all things food, then get out and support your favorite spot (and all their new quirks) – again, and again, again.